Run the Export Data Report
-
From the Home page or the drop-down menu, go to the Administration browse → Export Data.
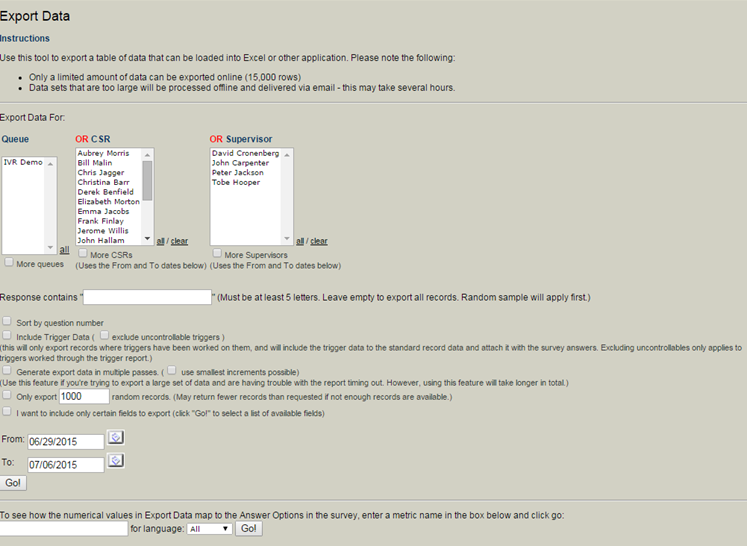
The following page opens:
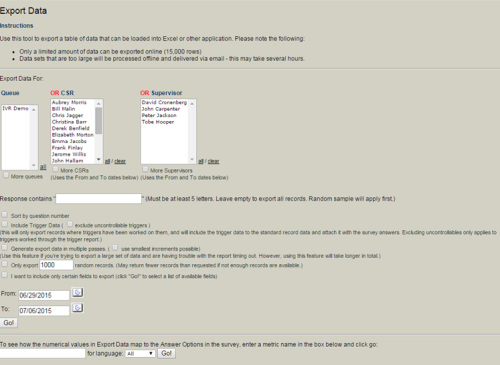
- In the Export Data section select the survey(s), specific CSR(s), or Supervisor(s) you need to export. Hold the [CTRL] key to make multiple selections. Click the all link to select everything listed in that category. Click the clear link to remove selections you made in the Queue, CSR, or Supervisor lists. If the queue you are looking for has not generated data for 31 days or more, click the More queues checkbox to view more surveys. The same applies for the More CSRs or More Supervisors checkboxes.
-
If needed, type the search text in the Response contains field. If this field is left blank all records will be exported.
-
Select the Sort by question number checkbox to have the questions appear in the order they were asked in the survey. By default, the export lists questions in alphabetical order.
-
Select the Include trigger data checkbox to see trigger data, as well as survey detail exports.
- If there is a timeout limitation with your system, select the Generate export data in multiple passes checkbox and the use the smallest increments possible checkbox. This will change the screen as the export is created to let your system know that the page is active and should restart the clock for timeouts. ECHO itself does not have a timeout limitation.
-
Set the number of random records to be exported and select the next checkbox.
-
Select the I want to include only certain fields to export checkbox, if wanted.
-
Using the From and To fields, type the date range you want for this report.
-
Click Go!
The Export Data page contains the directions for exporting the data to an Excel spreadsheet or a comma delimited text file.
There are two ways to export data to an Excel format or text only format:
- Click the wanted icon (Excel or text). The data will appear in a separate window.
- Right-click the icon and select “Save Target As…”


