Required security profile permissions: Chat Profiles Create
Chat profiles define the appearance of the Customer Chat Interface (that is, the chat window customers see when they contact your organization via chat). You can customize the colors of the window, enable the use of pre-chat forms, and add a waiting queue screen.
This topic explains the customization options available when you create a V2 (HTML5) chat profile.
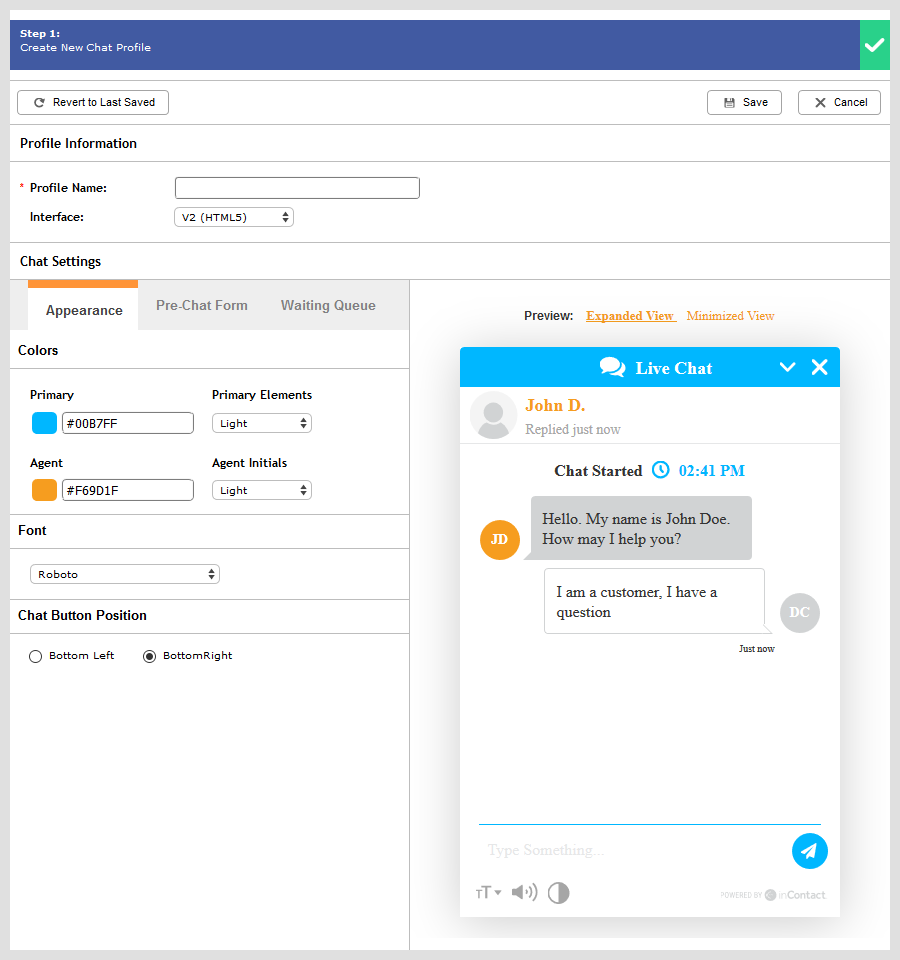
Profile Information
- Profile Name
- The unique, descriptive name you assign to your chat profile.
- Interface
- Allows you to select the type of interface for the chat profile. Select one of the following from the drop-down: V1 (ASPX) or V2 (HTML5).
Appearance
- Colors
-
Allows modification of the colors the Customer Chat Interface uses.
Colors can be selected by specifying the RGB code in the color field or by clicking the box next to the color field and using the color picker.
- Primary — Controls the title bar color, chat start time color, and the send button color.
- Primary Elements — Controls whether the title bar text is light or dark.
- Agent — Controls the color of the agent name and the background color of the initials icon.
- Agent Initials — Controls whether the initials are light or dark.
- Font
- Controls the font for the Customer Chat Interface window.
- Chat Button Position
- Determines whether the minimized chat window appears in the bottom left or right corner.
The Appearance tab allows for customization of the Customer Chat Interface. As you make changes, the Preview dynamically updates so you can see how the current configuration appears to the customer. You can choose to display the Preview in either expanded or minimized view.
Pre-Chat Form
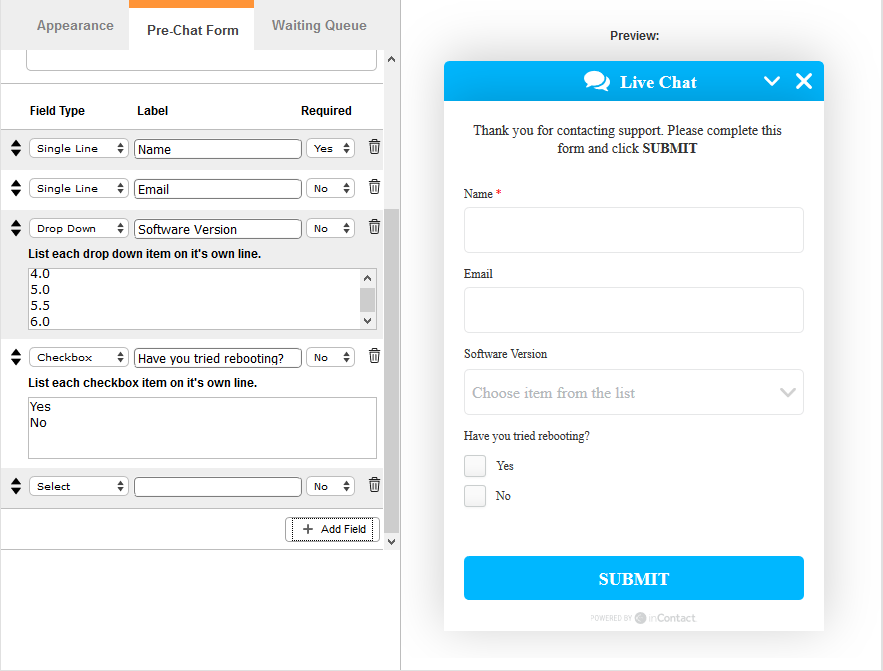
- Enable Pre-chat Form
- Toggles the pre-chat form on and off.
- Welcome Message
- The greeting the chat contact sees when they expand the live chat box.
- Field Type
- Allows you to define a type for each field on the form. The options are Single Line, Multi-line, Drop-Down, or Checkbox.
- Label
- The instruction that the chat contact sees on the form.
- Required
- Enables you to specify which fields on the form are required. Selecting this checkbox places a red asterisk (*) next to the field label on the form. The Submit button on the form is disabled until any required fields are filled in.
The Pre-chat Form tab allows you to optionally enable a pre-chat form for the Customer Chat Interface and configure the fields that appear on the form. You can use pre-chat forms to gather information from the customer prior to bringing an agent into the chat.
Waiting Queue
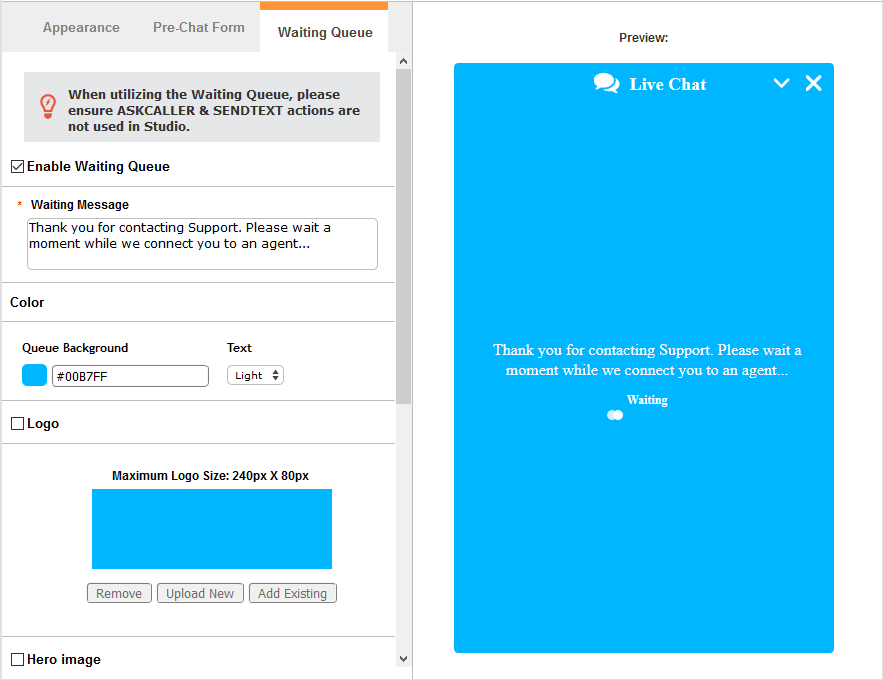
- Enable Waiting Queue Window
- Toggles the waiting queue window on and off.
- Waiting Message
- Allows you to create a custom greeting the customer sees while they wait to be connected to an agent. If the Studio script associated with this profile uses the QUEMSG action to let customers know their place in the queue, that message alternates with the message you configure here.
- Color
-
Allows you to modify the colors the waiting queue window uses. Colors can be selected by specifying the RGB code in the color field or by clicking the box next to the color field and using the color picker.
- Queue Background — Controls the background color of the waiting queue window.
- Text — Controls whether the waiting queue text is light or dark.
- Logo
- Allows you to upload a custom logo for the waiting queue window. The maximum size of this graphic is 240px by 80px.
- Hero Image
- Allows you to upload a large graphic that appears on the bottom half of the waiting queue window. The maximum size of this graphic is 380px by 300px.
The Waiting Queue tab allows you to optionally enable a waiting queue to appear in the Customer Chat Interface and to configure the appearance of the queue.


