Subscriptions allow you to automatically send reports at specified intervals to yourself or to other users via email. You can configure subscriptions for a single module, or for an entire dashboard. Not all modules support subscriptions. System administrators can edit or delete other user's subscriptions on the Subscription Management page.
Create Module Subscriptions from the Toolbar
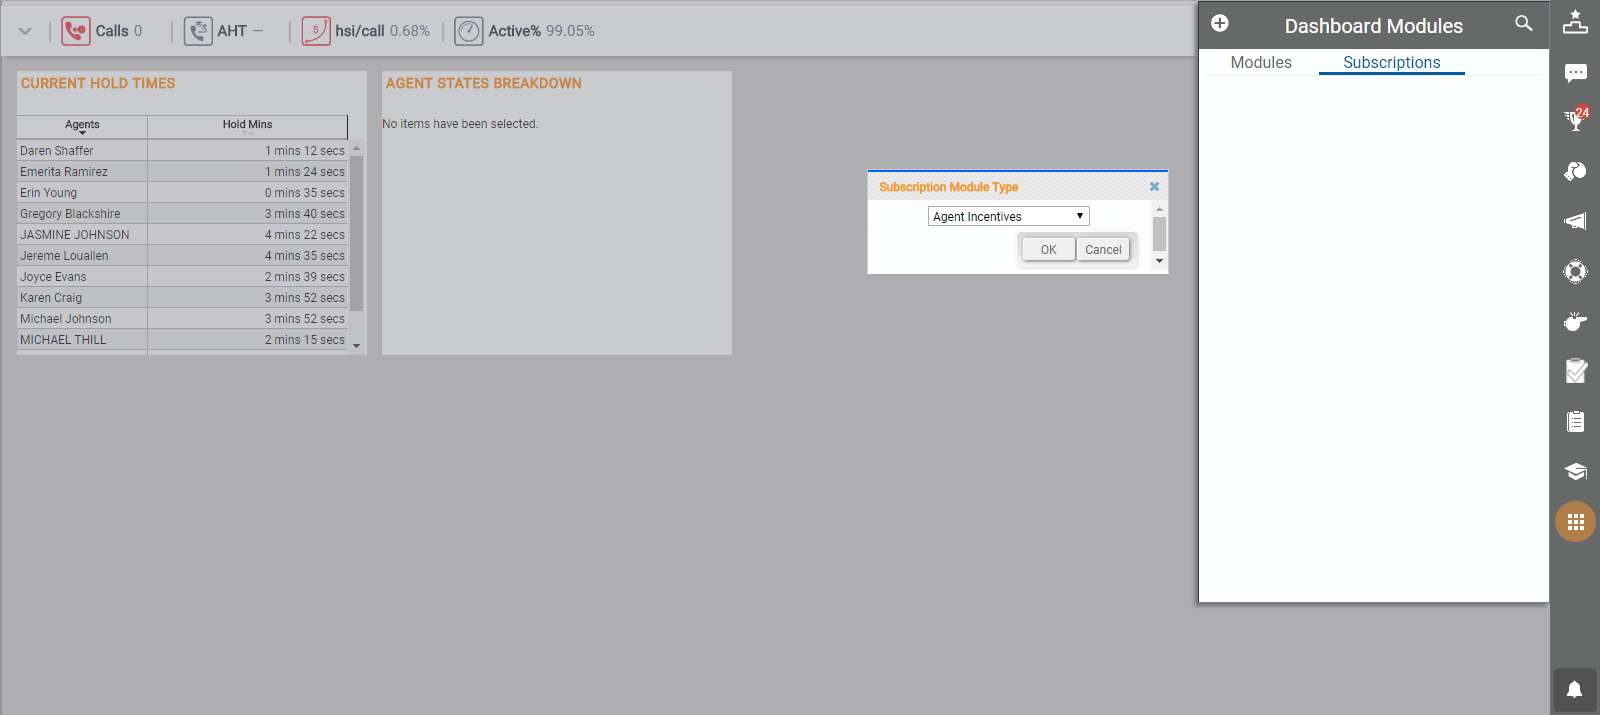
- Click Modules in the toolbar.
- Click Subscription.
- Click the New icon (indicated by plus sign in a circle).
- Select the module from the drop-down list of modules that support subscriptions.
- Click OK.
- In the settings window, configure the module options. These will vary depending on the module.
- Click anywhere on the screen except the settings window to close it.
- Click the calendar icon in the upper right corner of the module to open the schedule window.
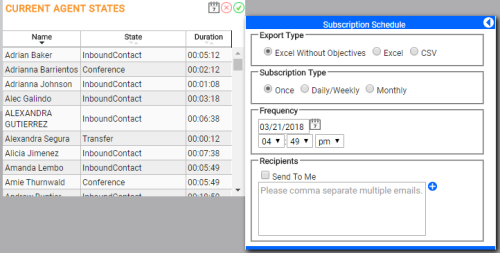
- In the Export Type section, select the format for the report from these three options:
- Excel without objectives — Exports the module data as an Excel spreadsheet and removes the red, yellow, and green formatting for objectives.
- Excel — Exports the module data as an Excel spreadsheet and retains the objectives with their red, yellow, and green formatting.
- CSV — Exports the module data as a CSVComma-Separated Values file; used to store tabular data such as a spreadsheet or database. file.
-
 Configure Once Subscription
- In the SubscriptionType section, select Once.
- Click the calendar icon and select a date for the report generation and delivery.
- Use the drop-downs to select a time for the report generation and delivery.
-
Configure Daily/Weekly Subscription
- In the SubscriptionType section, select Daily/Weekly.
- Select the checkboxes for the days of the week when the report should be generated and delivered.
- Click the calendar icons and select start and end dates for the report generation and delivery. If you do not select an end date, the subscription will continue until manually removed.
- Use the drop-downs to select a time for the report generation and delivery.
-
Configure Monthly (Day of Month) Subscription
- In the SubscriptionType section, select Monthly.
- Select Day of Month.
- For Day(s) of Month, click the drop-down and then select the checkboxes for the days of the month when the report should be generated and delivered.
- Click the calendar icons and select start and end dates for the report generation and delivery. If you do not select an end date, the subscription will continue until manually removed.
- Use the drop-downs to select a time for the report generation and delivery.
-
Configure Monthly (Day of Week) Subscription
- In the SubscriptionType section, select Monthly.
- Select Day of Week.
- For Occurrence, click the drop-down and then select the checkboxes for the weeks of the month when the report should be generated and delivered.
- Select the checkboxes for the days of the week when the report should be generated and delivered.
- Click the calendar icons and select start and end dates for the report generation and delivery. If you do not select an end date, the subscription will continue until manually removed.
- Use the drop-downs to select a time for the report generation and delivery.
- In the Repeat Options section, type a numeric value in the text box and select a value of mins or hrs from the drop-down. If you set repeat options, the report will be generated and delivered multiple times per day at the interval you specify.
- In the Recipients section, select the Send to Me checkbox if you would like subscriptions sent to yourself. To instead (or also) send the report to others, type one or more email addresses in the large text box. You can add them individually by clicking the Add icon (indicated by a plus sign in a blue circle) after each, or type multiple, comma-separated addresses and then add them all at once.
- Click the Save icon (indicated by a green checkmark).

Create Module Subscriptions from Module
- Click the Actions icon (indicated by an ellipsis) in the upper right corner of a module on the dashboard.
- Select Copy to → Subscription. This makes a copy of the module, and the subscription is based on the copy.
If the original module is changed in the future, it will not affect the subscription.
- Follow the steps in the Create Module Subscriptions from the Toolbar task to configure the subscription options, schedule, and recipients.
Create Dashboard Subscriptions
- Click Clearview and select the dashboard you want to use.
- Click the Expand icon (indicated by a downward-pointing angle bracket) on the KPI Bar to display the master filter.
- Click Subscribe.
- Follow the steps in the Create Module Subscriptions from the Toolbar task to configure the subscription options, schedule, and recipients.
- Click Apply.
Unsubscribe from Subscription
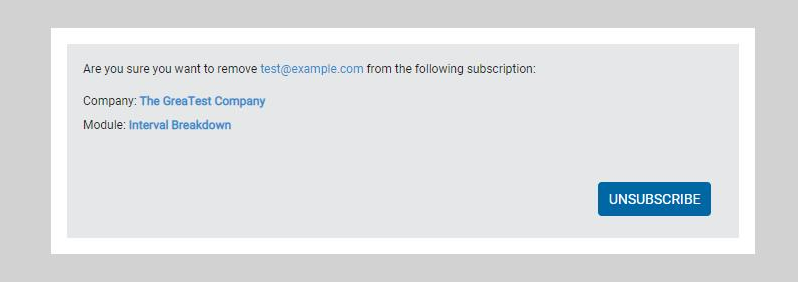
You can unsubscribe from a report by clicking the Unsubscribe link in the report email. This link will open a confirmation page in inView where you can confirm your decision by pressing the Unsubscribe icon.
Subscription Management Page
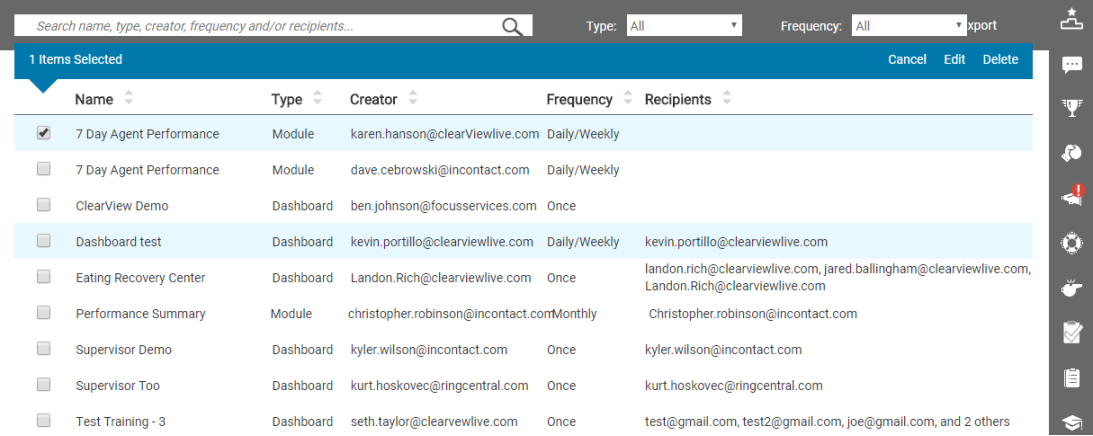
The Subscription Management page (Account → Subscription Management) allows system administrators to access subscriptions that other users create. Selecting one or more subscriptions displays a blue pop-up actions bar. Descriptions of the key features of the actions and pop-up actions bars are below:
Actions Bar
- Search
- Search for a subscription via name, type, creator, frequency, and/ or recipients.
- Type
- Use the drop-down to specify whether you want to export All, Module, or Dashboard subscriptions.
- Frequency
- Use the drop-down to specify whether you want to export All, Once, Daily/ Weekly, or Monthly subscriptions.
- Export
- Click to export the preferred subscription details as an Excel file.
Pop-up Actions Bar
- Edit
- Allows you to add or remove recipients of a subscription using their email address.
- Delete
- Allows you to delete a subscription.


