Modules
This topic provides general instruction for accessing and configuring modules. For specific information regarding the customization options for a module, see the reference topic for that module.
Configure Modules
- Click Clearview and select a dashboard.
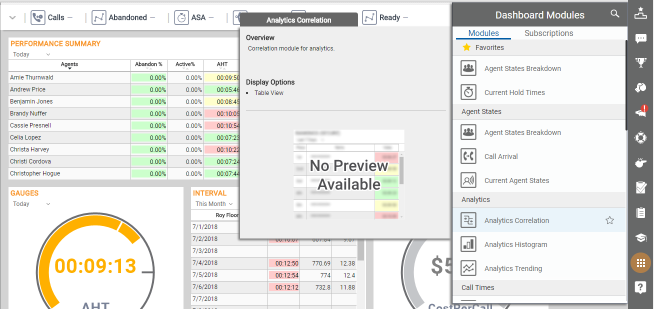
- Click Modules in the toolbar. Hovering over a module will slide-out preview information next to the modules window.
- Click a module to select it.
- Configure the date filter if the module includes this option and you want to use it. The default settings are inherited from the master filter. If you edit the date settings here, they will apply only to this module.
-
 Configure Metrics (if the module includes this option).
- Click Metrics on the right side of the module.
- Click the metrics you want to add them to the Selected Metrics column. To remove a metric from your selections, hover over it and click the Delete icon (indicated by a minus sign in a circle), or click the metric name again in the Metrics by Categories section.
- (OPTIONAL) To set a metric filter, click the ellipsis in the upper right corner of the metric, select Add/Edit Filter, and type values in the Min field, the Max field, or both. Metric filters can be used to refine data. For example, for a module that shows average handle time (AHT) for a group of agents, you might filter the metric to exclude very short calls (such as wrong numbers) in order to avoid skewed data.
Filtered metrics display a red triangle. When you run a module with a filtered metric, the filtered metric is automatically applied.
- Configure employee-based or call-based filters if the module includes this option and you want to use it.
- Configure other settings, if any, that the module includes and that you want to use.
- Click anywhere on the screen except on the settings window to close the window and save the module configuration.
You can click and hold along the top of the module and drag it to a new location on your dashboard. Existing modules on your dashboard may automatically shift to accommodate a new layout. You can also click the star next to a module to add it to a Favorites list, which appears at the top of the modules list for quick access.
Module Controls & Options

Modules displayed on a dashboard have a variety of controls that you can use adjust the display, drill down into the module data, and so forth. This section explains the most common of these options; however, not all appear on every module. One or more of the following may appear in the upper right corner of the module:
- Actions
-
Indicated by an ellipsis (...), the Actions menu enables you to select from the following module related actions:
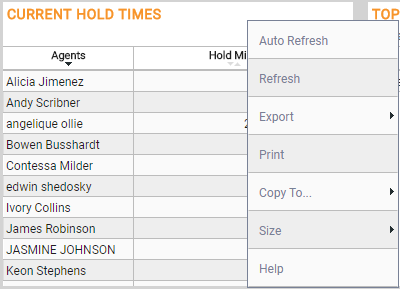
- Auto Refresh — Automatically refreshes the module data at periodic intervals. Auto-refresh will continue until you manually stop it by clicking the option again. This option is only available for modules that display data for the current day.
- Refresh — Manually refreshes the module data.
- Export — Allows you to export the module data in your choice of these formats: CSV, Excel, or Excel (No Objectives). The third option removes any objective-related coloring and information from the data export.
- Print — Allows you to print the module data by opening a new browser window and displaying the data in a table.
- Copy to — Allows you to copy the module to either a new Module or to a Subscription. This is useful if you want to display two instances of the module with just one difference in configuration. You can configure the first instance, then select Copy to → Module and change the one setting that should be different.
- Size — Changes the display size of the module depending on the data being displayed. You can choose from Default or Full Size.
- Help — This option is not currently used.
- Delete
- Indicated by a red X; allows you to remove the module from the dashboard.
- Auto
- Informational only; displays if the module is configured for Auto-Refresh.
- View
- Indicated by a rectangular list or chart; allows you to change the module display. Options vary depending on the module. See the module reference topic for more information.
- Settings
- Indicated by a gear icon; allows you to change the module settings as described in Configure Modules.


