Wallboards are special forms of dashboards that are designed to display modules, metrics, announcements, achievements, and so forth, on a television or monitor in your contact center.
This topic explains the four main steps to set up a new wallboard: Create New Wallboard, Add and Configure Slides, Edit Wallboards and Slides, and Publish Wallboard.
Create New Wallboard
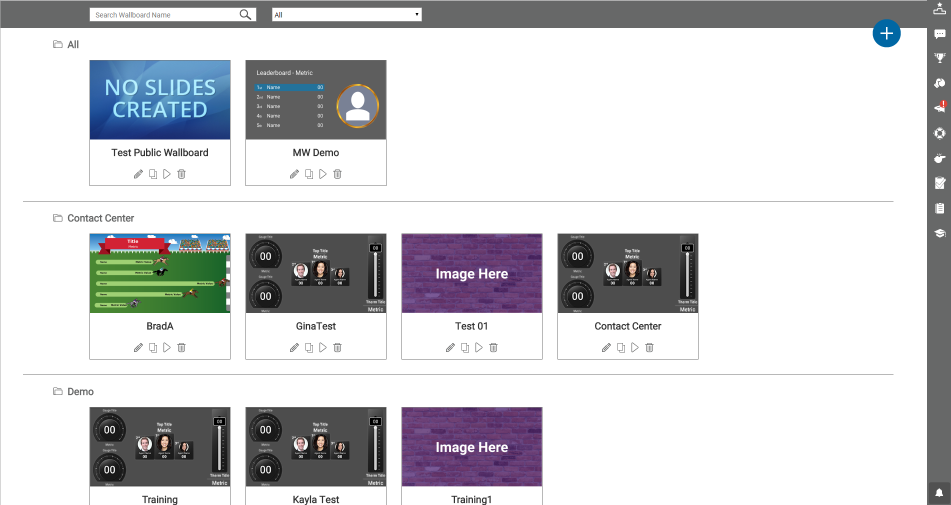
- Click Account→Wallboard Management to open the Wallboard Home page, which shows existing wallboards categorized by folder.
- Click the Add icon (indicated by a plus sign in a blue circle) at the top right of the page.
- Type a Name for the new wallboard.
- Select a folder from the Add to Wallboard folder drop-down list.
- (OPTIONAL) Type a Description.
- Configure Slideshow Options:
- Click the Show in Menu slider to specify whether the slideshow appears in the Wallboard Home menu. The default setting is Yes.
- Click the Allow Wallboard to be Interrupted slider if you want to be able to stop the wallboard from the device on which it is running. The default setting is Yes.
- Click Create.
Add and Configure Slides
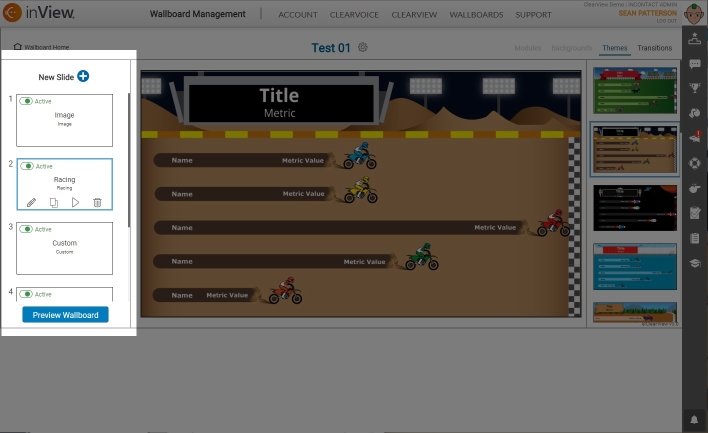
Structure your new wallboard like a presentation slideshow: by using slides to display different information. A variety of slide templates are available, such as a leaderboard or a race to a goal.
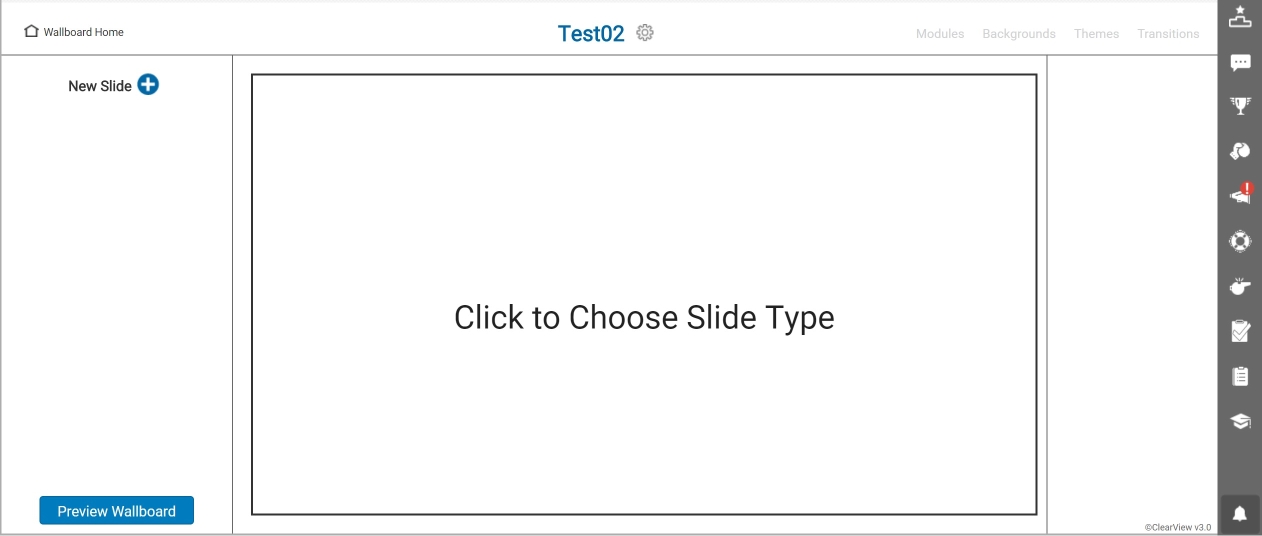
- Click Click to Choose Slide Type to open the Select a Slide Type window to create the first slide. As you add more slides, this window will show the currently active slide. To add additional new slides, click the New Slide Add icon (indicated by a plus sign in a blue circle) in the left side menu.
- Choose a Slide Type or customize your own by selecting Custom.
- Click Create.
-
 (OPTIONAL) Configure the template slide content by following the prompted steps.
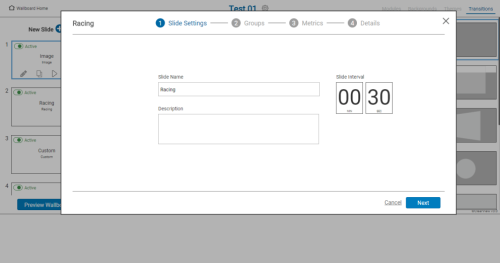
These steps may be different for certain slide templates, as each template may require specific information such as an agent photo or metric. The different steps are described below:
- Slide Settings — Add a name and description to the slide and determine how many minutes and seconds your slide will appear by changing the Slide Interval fields.
- Image — Select a Display Image by uploading an image or selecting a source from the drop-down menu.
- Groups — Determine which employee unit the metric will measure.
- Metrics — Select which metric the slide will present and customize the metric Display Name if so desired.
- Details — Customize the unique parts of the slide template, such as a race theme or Display Image.
- Employee — Select a specific employee by an existing Login name or Manual Input.
- Information — Choose how you want to spotlight an agent.
- Video — Enter a YouTube URL into the Video Link field and click Apply.
-
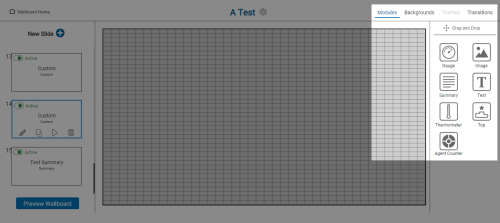
(OPTIONAL) Customize your own slide.
- Type a Slide Name.
- (OPTIONAL) Type a Description.
- (OPTIONAL) Change the Slide Interval duration. This determines how long the slide will appear on the wallboard. The default interval is 30 seconds.
- Click Save.
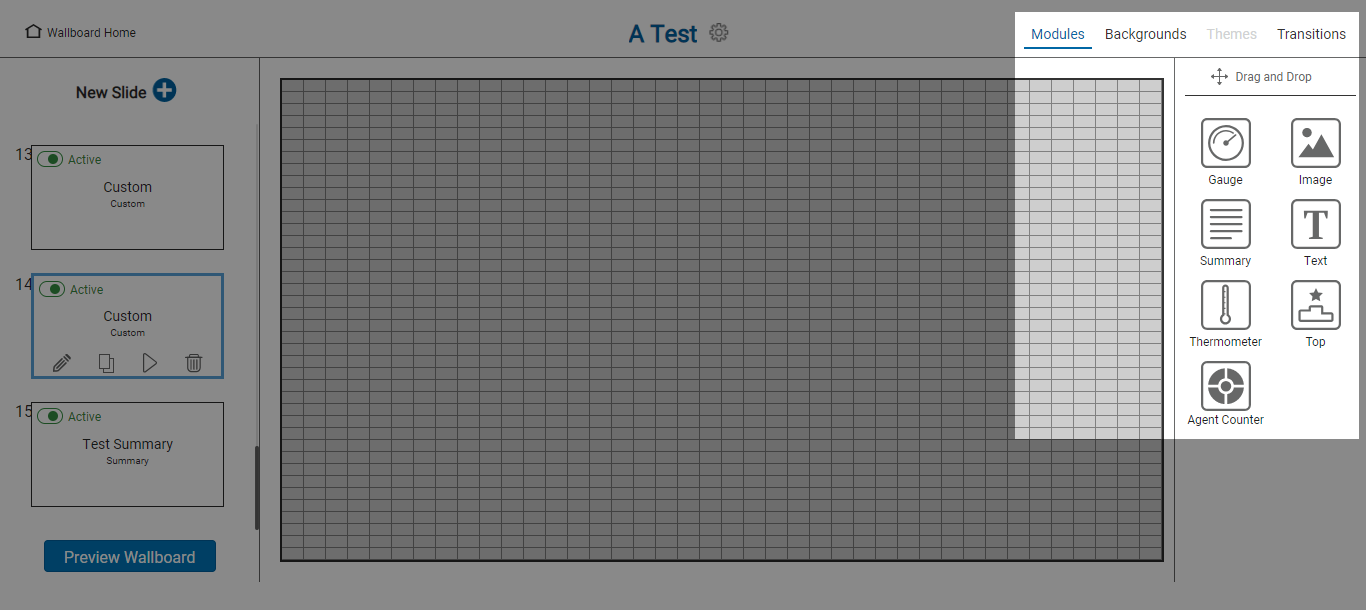
- Drag and drop modules into the main slide area from the right side menu. After dropping the module at your desired location on the slide, another settings window will appear. Configure the module content by following the prompted steps – similar to configuring slide content, described above.
- For more information on configuring module content and metrics, see the Master Filter and Set Up Metrics pages.
- Finish customizing your slide by using the tools on the right side menu. Select a category from the top of the right side menu, which provide features to add to your slide, such as a background image or slide transition.

Edit Wallboards and Slides
- Click Account→Wallboard Management to open the Wallboard Home page, which shows existing wallboards categorized by folder.
- Click the wallboard you want to edit.
- (OPTIONAL) Add a new slide by clicking the New Slide icon (indicated by a plus sign in a blue circle) and configuring the new slide. For more information on configuring slides, see the Add and Configure Slides section above.
-
(OPTIONAL) Edit an existing slide by selecting a slide thumbnail in the left side menu.
Four icons will appear at the bottom of the thumbnail. Each icon is described below.
- Pencil — Edit the slide settings in the content window.
- Paper Stack — Copy the slide.
- Play Button — Preview how the slide would appear in a slideshow.
- Garbage Can — Delete the slide.
- (OPTIONAL) Activate/ deactivate a slide by clicking the slider in the left corner of the slide thumbnail. The default setting is active, therefore deactivating a slide prevents it from appearing in the wallboard slideshow.
- (OPTIONAL) Click the blue Preview Wallboard icon at the bottom of the left side menu to launch a preview of your wallboard in a new window or tab.
- (OPTIONAL) Rearrange the slide order by clicking and dragging a slide thumbnail to a new position.
- (OPTIONAL) Click Wallboard Home above the left side menu to take you back to the Wallboard Home page to view existing wallboards and categorical folders.
Publish Wallboard
- Click Account→Wallboard Management to open the Wallboard Home page, which shows existing wallboards categorized by folder.
- Select which wallboard you want to publish.
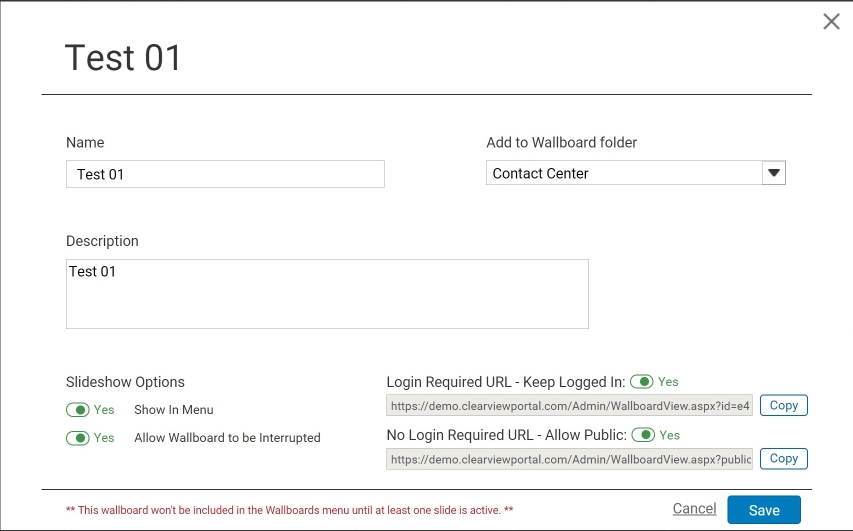
- Click the gear icon next to the wallboard name above the active slide. A slide information window will appear.
- Copy one of the two wallboard URL links.
- Copy the Login Required URL if you want to require a login when publishing the wallboard. Change whether or not the you want to stay logged in by clicking the slider next to Keep Logged In.
- Copy the No Login Required URL if you do not want to require a login when publishing a wallboard. If you do not want to allow public access to the URL link, click the slider next to Allow Public. The slider will change to a red No and the URL will disappear.
or
- Display your wallboard by pasting the copied URL into a web browser search bar and pressing Enter on your keyboard.


