Objectives enable you to establish performance levels for one or more metrics and assign these to users. When you view the objectives in inView, you can quickly see whether a user is performing at, above, or below objective for the metric.
For example, your center may want calls to have an average handle time (AHT) of eight minutes or less. You can set an objective for agents that establishes an AHT range of eight-fifteen minutes, and that triggers alerts when the value hits twelve minutes or higher.
This topic explains the Objectives page, as well as how to create and edit objectives.
Objectives Page
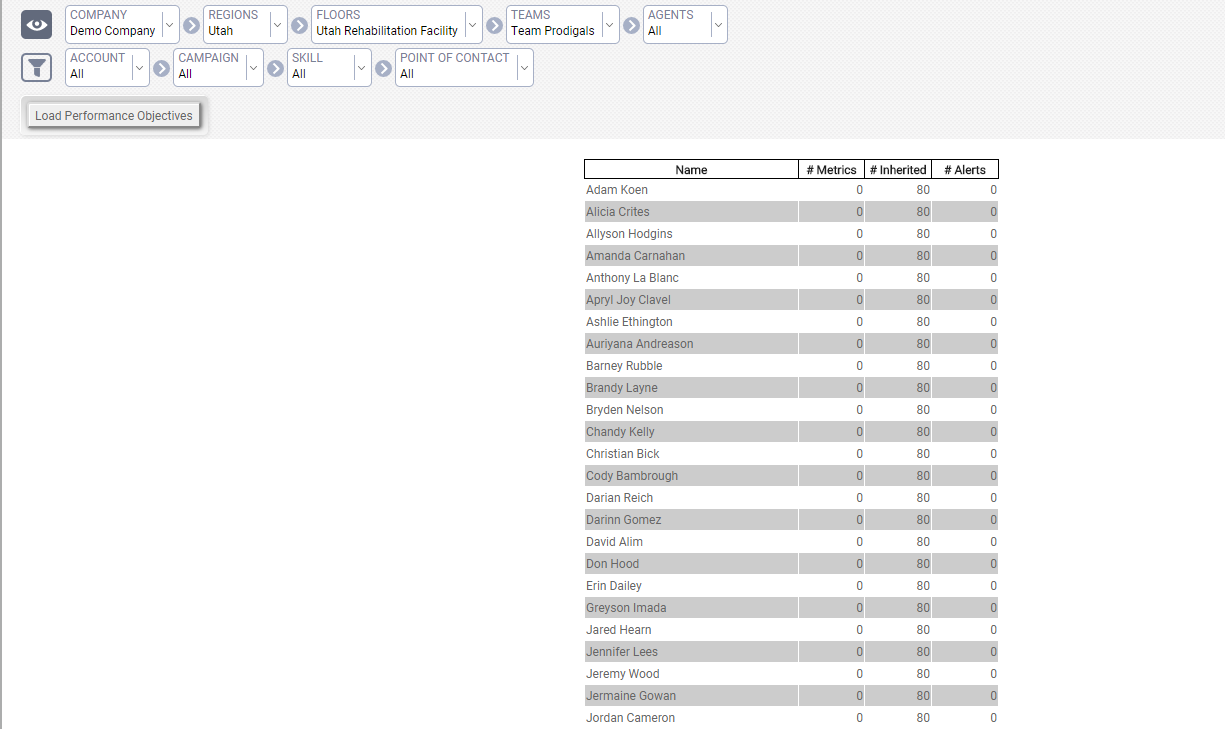
At the top of the page, you can use the filtering options to control the list of agents for whom you can set objectives. You can filter, in increasingly granular detail, by employee-based parameters (Company, Regions, Floors, Teams, and Agents) or call-based parameters (Account, Campaign, Skill, and Point of Contact). The agent list includes the following information:
- Name
- Name of the entity, such as team or agent.
- # Metrics
- Number of metrics that apply to that team or agent.
- Inherited
- Number of metrics inherited from a higher-level entity, such as a team or region.
- Alerts
- Number of alerts configured for the entity.
Create an Objective
- Click Account → Objectives
- Use the filter to narrow the list.
- Click Load Performance Objectives
- Select the entity for which you want to create an objective.
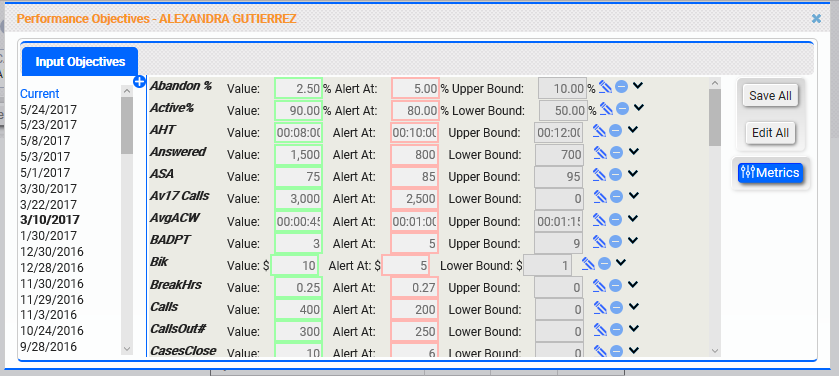
- (OPTIONAL) To view past objectives, click a date in the Input Objectives section.
- (OPTIONAL) If you want to create an objective for a future date, click the Add icon (indicated by a plus sign on a blue circle) just under the Input Objectives section header.
- Click the Metrics button to select the metric to which you want to assign an objective.
- Select a metric. You can only create one objective per metric on any given day.
- Type a Value. This is the goal for the metric and determines where the green area on a gauge module begins. In the example provided earlier, the AHT objective is eight minutes or less. Therefore, you would type 00:08:00 in this field.
- Type a value for Alert At. This number indicates when performance related to the objective is approaching unacceptable levels. For our example, an appropriate Alert At value might be 00:12:00. In gauge modules, performance between the Value and Alert At settings displays in yellow; performance falling beyond the Alert At value displays as red. Performance at this level also triggers any alerts you have created.
- Type a value for Upper/Lower Bound. This establishes a limit for what is considered the worst possible performance toward the metric and sets the ending point for the red area on a gauge module. The value is also used to calculate the percentage to objective statistic on metrics. The label of this field changes depending on the type of metric.
- (OPTIONAL) Click the Goal Direction arrow to change it. Metrics vary in terms of whether good performance is high (such as revenue per call) or low (such as AHT). You can use the Goal Direction arrow to adjust how inView handles the metric for this objective and therefore how colors are displayed. This value is preset when you create the metric but can be edited here if needed. For example, in most cases, your center may want AHT to be low. However, for one specific sales group, you have found that the higher the AHT, the higher the revenue per call. You can change the Goal Direction arrow for the AHT metric for an objective for this group.
- Click the Save icon (indicated by a floppy disk). The objective will be active immediately unless it was created for a future date.
Edit an Objective
- Click Account → Objectives
- Use the filter to narrow the list, and then click the entity for which you want to edit objectives.
- Click the pencil icon next to the objective you want to edit.
- Modify the objective. Refer to the previous section for more information about the available options.
- Click the Save icon (indicated by a floppy disk).


