Required security profile permissions: Direct Data Access View
The direct data access feature lets you securely connect to your business unit'sHigh-level organizational grouping used to manage technical support, billing, and global settings for your NICE inContact environment database in Microsoft Excel 2013 or later to create customized reports and analytics.
You must meet the following requirements before you can set up direct data access:
- Have the direct data access feature enabled in your business unitFile format associated with Microsoft Excel; may also be expressed as .xlsx. To do so, contact your
- Have a user ID with a security profile that can access the direct access feature.
- Run the Professional Plus edition of Microsoft Excel 2013 or greater or Microsoft Office 365 Excel.
You must meet the following system requirements before you can set up direct data access:
- 1 GHz or faster x86-bit or x64-bit processor with SSE2
- 1 GB RAM (32-bit); 2 GB RAM (64-bit)
- 3.0 GB available disk space
- 1366 x 768 screen resolution
- Graphics hardware acceleration requires a DirectX 10 graphics card
- Windows 7, Windows 8, Windows Server 2008 R2, or Windows Server 2012
- .NET version 3.5, 4.0, or 4.5
- An Internet connection. The speed is a factor for performance.
- A keyboard, mouse, or other standard or accessible input device
- Windows Search 4.0
- Silverlight 5.0
-
Open Excel and click File → Options.
-
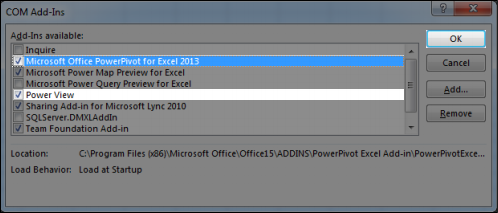
In the popup window, click Add-Ins. Set the Manage: drop-down to COM Add-Ins and click Go...
-
If they are not already selected, select the Micosoft Office PowerPivot for Excel and Power View checkboxes. Click OK.
-
Create a new workbook.
-
Open the Data Connection Wizard.
 If you are using Excel 2013
- Click the Data tab.
- Click the From Other Sources drop-down.
- Select From Analysis Services.
If you are using a version of Excel later than 2013
- Click the Data tab.
- Click Get Data. If you do not see Get Data, click New Query instead.
- Select From Database → From SQL Server Analysis Services Database (Import).
-
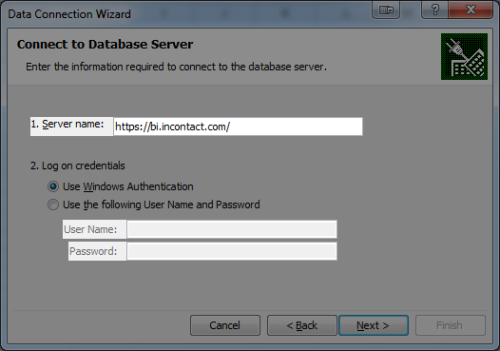
Identify your server by performing the following on the first page of the Data Connection Wizard:
- Set the Server name according to the following cluster information:
- A31 — https://bi-aa.niceincontact.com
- B2-C20 — https://bi.incontact.com
- E1 — https://bi.incontact.eu
- AWS C30 or C31 — https://bi-ao.incontact.com
- AWS C29 & C32 or higher — https://bi-ao.nice-incontact.com
- Click OK.
- Select the Use alternate credentials radio button.
- Set the User Name to your
- Click Connect.
The wizard changes to the Select Database and Table page.
When you set up the location and user credentials, you might encounter an error that says "Parser: The syntax for 'GET' is incorrect" as depicted below. Typically it means you entered the server name or your credentials incorrectly. Verify that your server name is correct and that you are using an HTTPS address and not an HTTP. Verify that you typed your credentials correctly.
- Set the Server name according to the following cluster information:
-
Select the data model you want to use for your reports from the Select the database that contains the data you want drop-down. You can choose from ACD (automatic call distribution)Automated Call (or Contact) Distribution; system that recognizes, routes, and connects contacts to available agents based on skill and priority. Detail (Contact Detail), Insight (Contact Summary), Intraday ACD Detail (Intraday Contact Detail), or Personal Connection.
-
Select the perspective you want to connect to. You have the following options:
- Agent Statistics — Limits your view to statistics that relate to agents. Limiting your statistics can minimize data issues caused by attempting to bring unrelated data into a single report.
- Contact Statistics — Limits your view to statistics that relate to contacts. Limiting your statistics can minimize data issues caused by attempting to bring unrelated data into a single report.
- Model — Contains a full list of all available data.
-
Click Finish.
The wizard changes to the Save Data Connection File and Finish page.
When you set up the connection to a data model, you might encounter an error message that says "Errors in the OLE DB provider" as depicted below. If you receive this error, the PowerPivot plug-in is not enabled. See the first few steps of this procedure for instructions for enabling it.
-
Set the Friendly Name to something easy to remember. If you intend to use this connection for Power View reports, you must select the Save Password in FIle checkbox. In any other case, selecting the checkbox is optional. Leaving it unchecked requires that you reenter your username and password every time you reconnect. Click Finish.
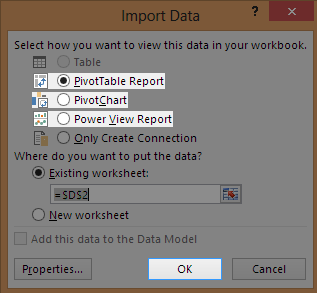
The Import Data window appears.
- PivotTable Report — Builds a tabular, pivot table-based report.
- PivotChart — Builds visualizations off of a pivot table-based report.
- Power View Report — Builds a graphical report using Excel Power View.

Choose from one of the following three options from the radio buttons in the Import Data window:
Click OK.
When you attempt to start a new PowerView report, you might encounter an error that says "something went wrong while loading the model for the item or data source" as depicted below. It means that you did not select the Saved Password in File checkbox. You need to create a new connection and make sure you select the option as documented in the steps above.


