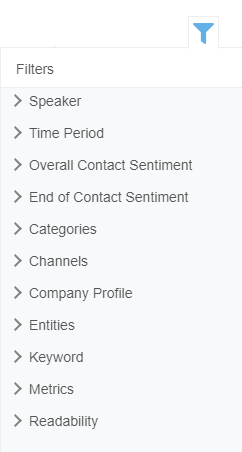
You can use the Filters pane by clicking on the filter icon on the right side of a dashboard page. This pane allows you to filter the data that appears in the dashboard The named view of one or more analysis widgets.widgetsA graphical chart with data that meets specified filter criteria to help contact center supervisors and managers understand trends in the contact center.. While you can apply filters inside some dashboards based on the data displayed, the Filters pane allows you to apply any filter to all of the dashboards in Topic Analysis, not just a single dashboard. You can reset all applied filters and revert to viewing all contacts available in the topic by clicking the Reset All icon in the top right corner of the Filters pane.
Filter by Speaker
The speaker drop-down at the top of the Filters pane allows you to choose whether you want the dashboard to display data from the agent or contact side of the interactions. When you drill down to view the contacts, you still see both sides of the interaction. To use it:
-
Open the topic you want to view by clicking Home and then the topic you want to view.
- Click the Filters icon indicated by a blue funnel in the top right corner of your screen.
- Click the arrow in the Agent/Customer drop-down and select Agent to view only agent data in the dashboard or select Customer to view only contact data in the dashboard, or select Both to view data for the agent and the customer.
Filter by Time Period
By default, dashboardsThe named view of one or more analysis widgets. display topic data from the past seven days. You can customize the time period so the dashboard only displays data from today, yesterday, or from a custom time range where you specify the start and end date of the data you want to see.
-
Open the topic you want to view by clicking Home. Click the topicA set of voice, email, or chat transcriptions from your contact center that spans a specific period of time and matches your specified filter criteria. you want to view.
- Click the Filters icon indicated by a blue funnel in the top right corner of your screen.
-
Click the Time Period drop-down and select one of the following options:
- Date Range —Displays data from start date and end date of the data as defined in the topic.
- Today — Displays data ranging from 12:00 AM today to now.
- Yesterday — Displays data from the past 24 hours.
- Last Seven Days — Displays data from the last week.
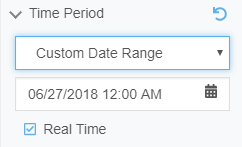
Custom Time Range — Displays data from a time range you specify. By default the custom end time is now.
-
 If you selected Custom Time Range and want to change the time range:
- Clear the Real Time checkbox and click inside the first date and time text field to set the start date of the date range.
- Beginning of Today — Sets the start time to 12:00 AM today.
- Yesterday — Sets the start time to 12:00 AM yesterday.
- One Week Ago — Sets the start time to 12:00 AM seven days ago.
- Two Weeks Ago — Sets the start time to 12:00 AM 14 days ago.
- 30 Days Ago — Sets the start time to 12:00 AM 30 days ago.
Specific date and time — The calendar and time fields allow you to select a specific date and time where you want the date range to begin. Select the date by using the single arrows to navigate by month and the double arrows to navigate by year. Click the day you want to select. Select the time by selecting the hour, minutes, and AM or PM in the time drop-downs.
- Click inside the second date and time text field to set the end date of the date range. You can choose any of the following options:
- Now — Sets the end time to the current date and time.
- Yesterday — Sets the end time to the current time yesterday.
- One Week Ago — Sets the end time to the current time seven days ago.
- Two Weeks Ago — Sets the end time to the current time 14 days ago.
- 30 Days Ago — Sets the end time to the current time 30 days ago.
- Clear the Real Time checkbox and click inside the first date and time text field to set the start date of the date range.
Remove a Time Period Filter
To reset the Time Period filter to the default setting of real time starting seven days ago, click the blue reset icon next to Time Period.
Filter by Overall Contact Sentiment
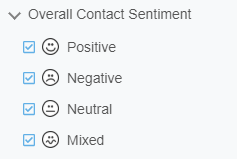
You can filter the topicA set of voice, email, or chat transcriptions from your contact center that spans a specific period of time and matches your specified filter criteria. data that appears in dashboards by the overall contact sentimentThe overall mood of the contact, or the result of the call as determined by analysis of words, phrases, and context of the transcript. An interaction can be positive (blue), negative (red), mixed (dark gray), or neutral (light gray). associated with the data. Because all contacts have a sentiment associated with them, something must be selected. The default is to include contacts of all sentiments.
-
Open the topic you want to view by clicking Home and then the topic you want to view.
- Click the Filters icon indicated by a blue funnel in the top right corner of your screen.
- Click the Overall Contact Sentiment drop-down.
- Select the checkbox next to each sentiment you want to include in the data displayed on the dashboard. To quickly select only one sentiment, hover over that sentiment and click Only. It selects that sentiment checkbox and clears the other three.
Filter by End of Contact Sentiment
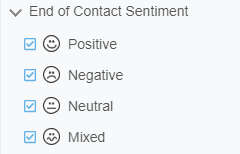
You can filter the topicA set of voice, email, or chat transcriptions from your contact center that spans a specific period of time and matches your specified filter criteria. data that appears in dashboards by the end of contact sentimentThe overall mood of the contact, or the result of the call as determined by analysis of words, phrases, and context of the transcript. An interaction can be positive (blue), negative (red), mixed (dark gray), or neutral (light gray). associated with the data. This allows you to view data related to how a customer or agent was feeling at the end of an interaction. Because all contacts have a sentiment associated with them, you must select something. The default is to include contacts of all sentiments.
-
Open the topic you want to view by clicking Home and then the topic you want to view.
- Click the Filters icon indicated by a blue funnel in the top right corner of your screen.
- Click the End of Contact Sentiment drop-down.
- Select the checkbox next to each sentiment you want to include in the data displayed on the dashboard. To quickly select only one sentiment, hover over that sentiment and click Only. It selects that sentiment checkbox and clears the other three.
Filter by Categories
You can filter topic data that appears in the topicA set of voice, email, or chat transcriptions from your contact center that spans a specific period of time and matches your specified filter criteria. dashboardsThe named view of one or more analysis widgets. by categoryThematic buckets into which the NICE inContact Interaction Analytics Pro engine places parsed call transcript data to make it easier to find trends.. By default, dashboards display all categories in the category setThe structure of the transcript data your topic gleans, organized to aid in using the data for a specific purpose. Out-of-the-box category sets include Intent to Buy and Risk Aversion. applied to the topic; however, you can configure it to include only categories you specify.

-
Open the topic you want to view by clicking Home and then the topic you want to view.
- Click the Filters icon indicated by a blue funnel in the top right corner of your screen.
- Click the Categories drop-down and click Choose Categories.
- In the Choose Categories window, click the name of any category to open its subcategories.
-
Select the checkbox next to any category you want the dashboard to include.
When you select a category, it includes all of its subcategories. You do not need to select them separately.
- Click Choose.
Remove Category Filters
To remove a category from the list of filters, clear its checkbox.
To reset the Categories filter to the default setting of no category filtering, click the blue reset icon next to Categories.
Filter by Channels
By default dashboardsThe named view of one or more analysis widgets. display topicA set of voice, email, or chat transcriptions from your contact center that spans a specific period of time and matches your specified filter criteria. data from all channels available in the topic. You can filter the dashboard by filtering the topic data to include data from only certain channels. Because all contacts originate from a certain channel, you must have something selected. The default is to include all channels selected in the topic.

-
Open the topic you want to view by clicking Home and then the topic you want to view.
- Click the Filters icon indicated by a blue funnel in the top right corner of your screen.
- Click the Channels drop-down.
- Select the checkbox beside each channel you want to use for filtering. To quickly select only one channel, hover over the channel and select Only. The select box beside that channel becomes selected and all other channels become cleared.
Filter by Company Profile
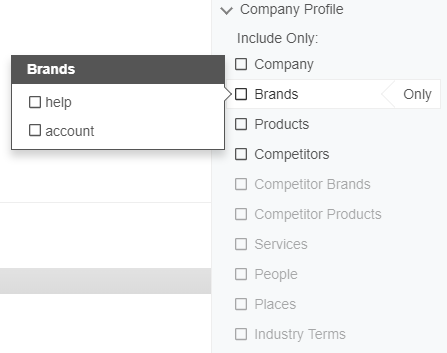
The Company Profile filter allows you to filter based on the data configured in the company profileA form where you can create custom entities that inContact Analytics can use to parse and analyze data that is of interest to your company., including entities configured for company, brands, products, and other fields in the company profile. You can filter on the broader type, like product, or drill down to include only certain products.
-
Open the topicA set of voice, email, or chat transcriptions from your contact center that spans a specific period of time and matches your specified filter criteria. you want to view by clicking Home and then the topic you want to view.
- Click the Filters icon indicated by a blue funnel in the top right corner of your screen.
- Click the Company Profile drop-down.
- To include all configured entities under a single type, select the checkbox beside the type name.
- To select only certain entities under a type, hover over the type name and select the checkbox next to each entity in the pop-up. When you select only some entities in a type, the type checkbox turns blue but does not contain a check.
Remove Company Profile Filters
To remove a type from the filters, clear its checkbox.
To remove a term from the filters, hover over its type then clear the checkbox next to its name.
To remove all but one type from the applied filters, hover over the type name and click Only. The chosen type is selected and the other types are cleared.
To remove all but one entity filter for a single type, hover over the type, then hover over the name of the entity and click Only. The chosen entity is selected and the other entities are cleared.
To reset the Company Profiles filter to the default setting of no filtering, click the blue reset icon next to Company Profile.
Filter by Entities
The Entity filter allows you to include or exclude contacts from the displayed data based on entitiesA term that represents a theme or concept. NICE inContact Interaction Analytics Pro intelligently searches for related keywords and context to gather instances of the concept rather than searching for every specific instance of a keyword. For example, the 'sound quality' entity applies to transcripts where people say things like "I can't hear you" or "you're breaking up". You can create custom entities specific to your organization in the company profile. they contain.
-
Open the topic you want to view by clicking Home and then the topic you want to view.
- Click the Filters icon indicated by a blue funnel in the top right corner of your screen.
- Click the Entities drop-down.
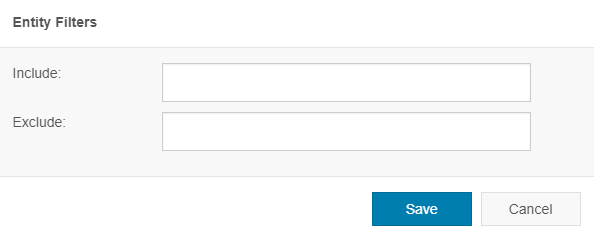
- Click Edit Entity Filters.
-
In the Include field, type the entities you want all contacts reflected in the dashboard to include. In the Exclude field, type the entities you want all contacts reflected in the dashboard to not include.
Entities are pre-configured and included in the product, so they must appear in the drop-down as you type for you to use them. If you want to create custom entities, you must configure them in the company profile. If you want to filter based on keywords and phrases, see Filter by Keyword.
- Click Save.
- Repeat steps 3-5 to add more entity filters.
Deactivate/Reactivate Entity Filters
To deactivate an entity filter in the list of filters, clear its checkbox.
To reset the Entities filter to the default setting of no entity filtering, click the blue reset icon next to Entities.
Remove Entity Filters
To remove an entity from the list of entity filters, click Edit Entity Filters. Click the X of any tag you want to remove. Click Save.
Filter by Keyword
The Keyword filter allows you to include or exclude contacts from the displayed data without modifying the topicA set of voice, email, or chat transcriptions from your contact center that spans a specific period of time and matches your specified filter criteria. settings. You can include only contacts with certain keywordsAn individual word you enter into NICE inContact Interaction Analytics Pros to flag it as a word with special significance or as a word to use as criteria for including or excluding data from a topic or widget. or phrasesA combination of words, contained in double quotes (""), you enter into NICE inContact Interaction Analytics Pro to flag it as a phrase with special significance or as a phrase to use as criteria for including or excluding data from a topic or widget. and exclude contacts with certain keywords or a certain phrase. In addition to using the Keyword filter, you can apply keyword filters from the Keywords Widget.
Keyword and phrase searching identifies instances of the exact word or phrase in the contacts included in the topic. For an intelligent, context-based search for the concept the keyword or phrase represents, including similar or related words, filter by entitiesA term that represents a theme or concept. NICE inContact Interaction Analytics Pro intelligently searches for related keywords and context to gather instances of the concept rather than searching for every specific instance of a keyword. For example, the 'sound quality' entity applies to transcripts where people say things like "I can't hear you" or "you're breaking up". You can create custom entities specific to your organization in the company profile. instead.
-
Open the topic you want to view by clicking Home and then the topic you want to view.
- Click the Filters icon indicated by a blue funnel in the top right corner of your screen.
- Click the Keywords drop-down.
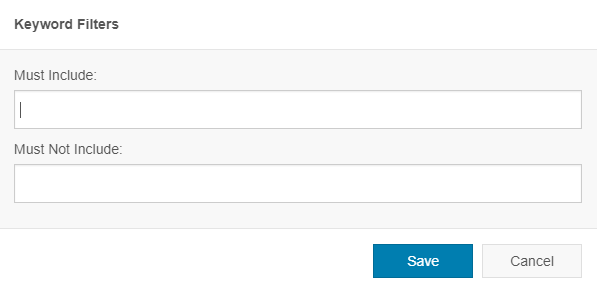
- Click Edit Keyword Filters.
- In the pop-up, type keywords you want each contact displayed on the dashboard to contain in the Must Include field. Type the keywords you want each contact displayed on the dashboard to not contain in the Must Not Include Field. To type a phrase, you must contain it in double quotes (").
- Click Save.
Deactivate/reactivate Keyword Filters
To deactivate a keyword or phrase in the list of filters, clear its checkbox.
To deactivate all but one keyword or phrase from the list of filters, hover over the keyword or phrase you want to keep and click Only. The chosen keyword remains selected and the other keywords become cleared.
To reset the Keywords filter to the default setting of no keyword filtering, click the blue reset icon next to Keywords.
To reactivate a keyword or phrase, select its checkbox.
Remove Keyword Filters
To remove a keyword or phrase from the list of keyword filters, click Edit Keyword Filters. Click the X of any tag you want to remove. Click Save.
Filter by Metrics
The Metrics filter allows you to filter by NICE inContact metadata fields. You can view topic data that contains certain values for the specified data field.
-
Open the topic you want to view by clicking Home and then the topic you want to view.
- Click the Filters icon indicated by a blue funnel in the top right corner of your screen.
- Click the Metrics drop-down.
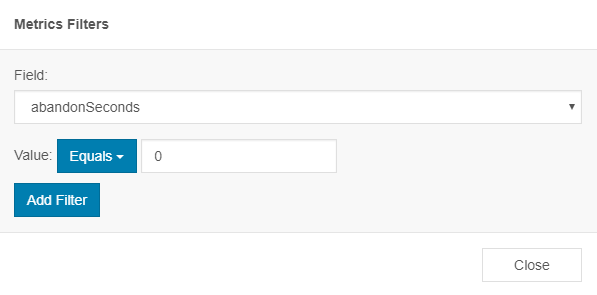
- Click Add Filter.
- Select the Field by which you want to filter your dashboard data. See Metrics Widget for descriptions of all available fields.
-
OPTIONAL: If you select a field that requires an integer for the Value, an operator drop-down appears in the Value field. Select an operator from the drop-down:
- Equals — for data to appear in the dashboard, its value for the specified field must be equal to the specified Value.
- Greater Than — for data to appear in the dashboard, its value for the specified field must have a higher value than the number specified in Value.
- Less Than — for data to appear in the dashboard, its value for the specified field must have a lower value than the number specified in Value.
- Greater Than or Equal To — for data to appear in the dashboard, its value for the specified field must have a higher value, or be the same as, the number specified in Value.
- Less Than or Equal To — for data to appear in the dashboard, its value for the specified field must have a lower value, or be the same as, the number specified in Value.
- Type the value you want to assign to the Field in the Value field.
Remove Metric Filters
To remove filters from the Metrics filters, click the blue minus (-) icon next to the filters you want to remove.
Filter by Readability
A quality and readability algorithm evaluates voice transcripts and assigns a high or low confidence ranking. You can filter out the lower quality transcripts, as well as the insights derived from them.
-
To open the topic you want to view, click Home and then click the topic.
- Click the Filters icon indicated by a blue funnel in the top right corner of your screen.
- Click the Confidence drop-down and click the checkbox to deselect Low.
-
To restore all transcripts, click the checkbox to select Low or click the Undo icon.
Filtering by high confidence will likely return transcripts with errors, but with a higher level of readability than that of lower quality transcripts.


