Coaching enables you to determine which agents need assistance to perform their jobs, and helps you schedule and manage sessions to provide that assistance. inView can use parameters you configure in the rules engine to analyze agent performance and generate a report of those agents who need coaching. You can also create coaching sessions manually when needed.
Coaching forms can be used to assist coaches in standardizing sessions or to allow agents to provide feedback on the value of a coaching session. They can also be used to assign tasks during a session.
Coaching Form Page
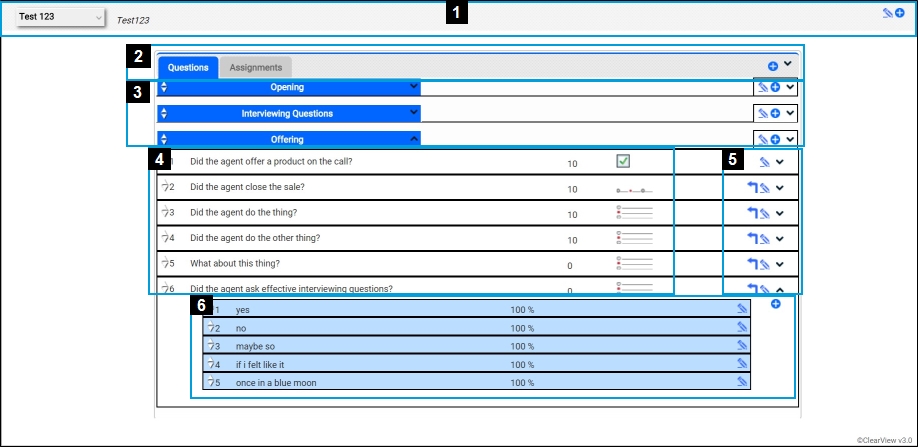
- 1—Form Options
-
- The drop-down on the left shows a list of existing survey forms.
- The Edit Form icon on the right (indicated by a blue pencil) opens the Edit Form dialog box which allows you to change the name and description of the survey.
- The Add Form icon on the right (indicated by a blue circle with a plus sign) creates a new survey form.
- 2—Coaching Form Bar
- This bar contains elements to edit and control the form overall. The following items explain each element:
- Questions — Displays the subform(s) and corresponding questions and answers.
- Assignments — Displays which agents and groups to which this survey is assigned.
- Add Subform Icon — Allows you to add additional subforms by clicking this icon (indicated by a blue circle with a plus sign).
- 3—Subform Bar
- Each subform has a bar which enables you to add questions, edit details such as the name or description, and expand/ collapse the subform.
- 4—Question Details
- This area contains the following elements:
- Move Question Icon — Moves the question by clicking and dragging the icon (indicated by an up and down arrow) up or down in the list. Your pointer will change into a compass as you hover over the arrows.
- Question field — Displays the question.
- Question Weight — Displays each question's weight, which affects the importance of any given question and its affect towards the total score.
- Type of answer — Displays the type of answer for any given question to the right of the question weight, such as a text box or multiple-choice radio buttons.
- 5—Edit Icons
- The icons on the right side of each question allow you to perform the following:
- Make Dependent Icon — Makes a question dependent on the preceding question after clicking the icon (indicated by a right-angle arrow).
- Edit Question Icon — Opens the Edit Question dialog box to change elements of the question, such as the name or description, after clicking the icon (indicated by a blue pencil).
- Expand/Collapse Icon — Shows or hides the answer details drop-down after clicking the icon (indicated by an angle bracket).
- 6—Answer Details
- Click the Expand/Collapse Answers icon (indicated by an angle bracket) to display answer details for each question. The following items explain elements of the answer details drop-down.
- Move Answer Icon — Moves the answer by clicking and dragging the icon (indicated by an up and down arrow) up or down in the list. Your pointer will change into a compass as you hover over the arrows.
- Answer field — Displays the answer option.
- Answer Percent — Displays how often this answer is selected.
- Edit Answer Icon — Opens the Edit Answer dialog box to change elements of each answer, such as the name of position, by clicking the icon (indicated by a blue pencil).
- Add Answer Icon — Allows you to add additional answers by clicking this icon (indicated by a blue circle with a plus sign).


