The inView rules engine lets you configure rules that serve as the basis for competition and achievements in your contact center. This feature works with coins, badges, and experience points (XP) to help you create a fun and engaging work environment for your agents.
Rules Engine Page
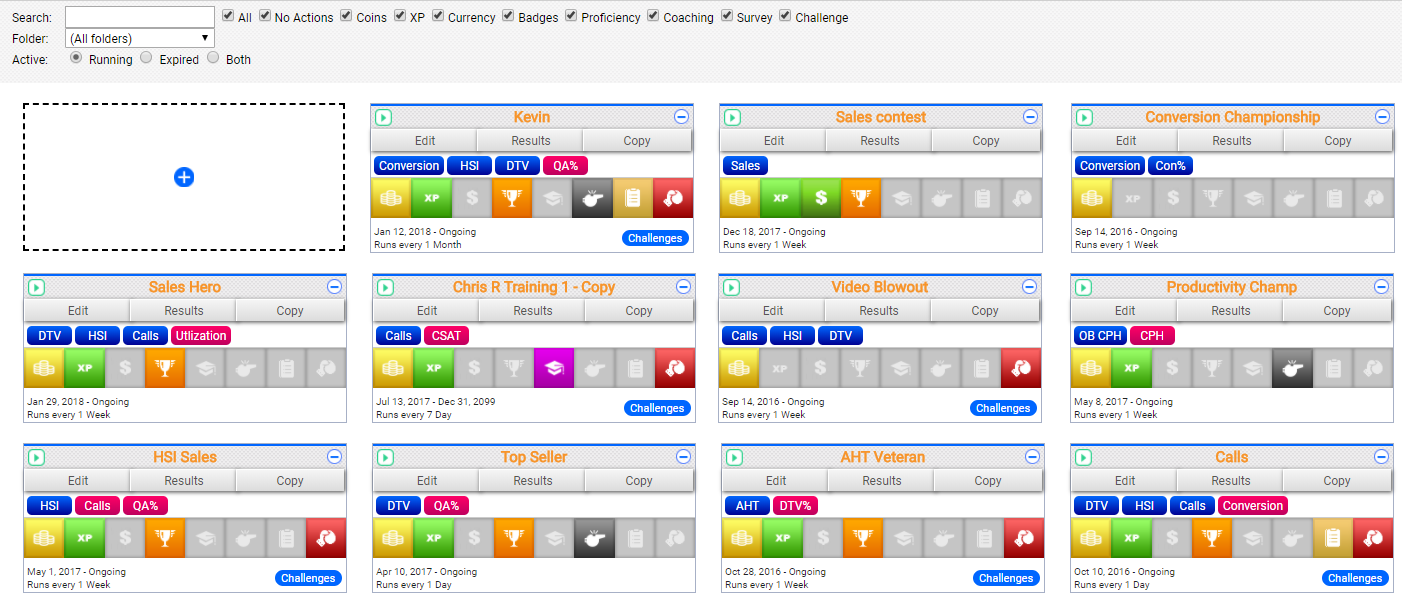
The Rules Engine page displays all the rules in your system. You can use the filtering tools at the top of the page to limit the display to only rules with specific types of actions, only rules saved in a certain folder, or both. You can view rules that are running, expired, or both. You can also search for a rule by name.
Rules
For each rule, you can see the following information:
- Rule Name
- Name assigned to the rule when it was created or last saved. A Play icon to the left of the name allows you to run a simulation of the rule. A Delete icon to the right of the name allows you to remove the rule.
- Action Buttons
- Actions you can take with regard to the rule. Edit allows you to modify the rule. Results displays the results of the rule for a period of time you specify. Copy allows you to copy all or part of the rule to use as the basis for another rule.
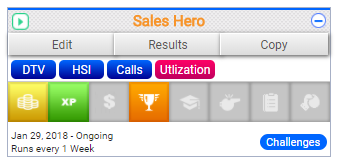
- Metrics
- Metrics and qualifiers associated with the rule. In the previous image, the metrics are DTV, HSI, Calls, and Utilization. You can click any metric to open the Metrics page for the rule.
- Actions
- Actions that are configured for the rule. In the previous image, the rule includes Coins, XP, and Badges actions. You can hover over an action to see the action categories in which it is used. You can click any action to open the Actions page for the rule.
- Schedule
- Information about when the rule was created, when (or if) it is scheduled, and the frequency at which the rule runs. In the preceding image, the rule was created January 29, 2018, is ongoing, and runs weekly.
- Challenges
- Displays in the lower right corner only if the rule is configured to allow challenges, as shown in the preceding image. You can click Challenges to view more information about any challenges that are running or have run for the rule and to manage challenge participants
Create Rules
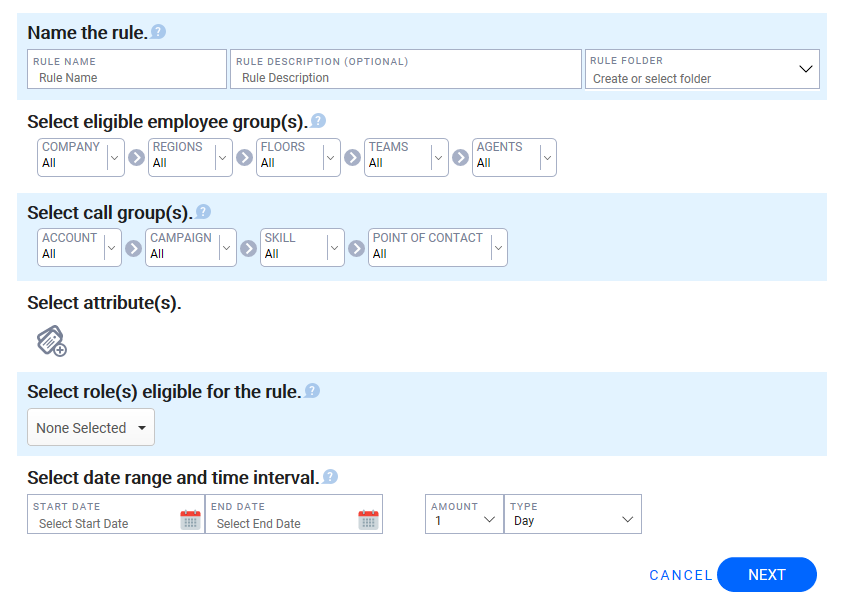
- Click Account → Rules Engine.
- Click the Add icon (indicated by plus sign in a blue circle) in the empty box at the top left of the page.
- Type a unique Rule Name and, optionally, a Rule Description.
- (OPTIONAL) Select a Rule Folder from the drop-down list if you organize rules in this way.
- Use the drop-down filters to select the employee groups to whom the rule will apply. Your options are Company, Regions, Floors, Teams, and Agents.
- Use the drop-down filters to select the call groups to whom the rule will apply. Your options are Account, Campaign, Skill, and Point of Contact.
- Click the Attributes icon (indicated by tags with a plus sign) to configure attributes for the rule.
- Select the roles eligible for the rule by using the drop-down list of roles in your system.
- Click calendar icons to configure a Start Date and an End Date for your rule. If you want the rule to run indefinitely, leave the End Date blank.
- Use the Amount and Type fields to configure how frequently the rule should run. For example, if you want the rule to run daily, type 1 in the Amount field and select Day from the Type drop-down list.
- Click Next.
Enter Metrics and Qualifiers
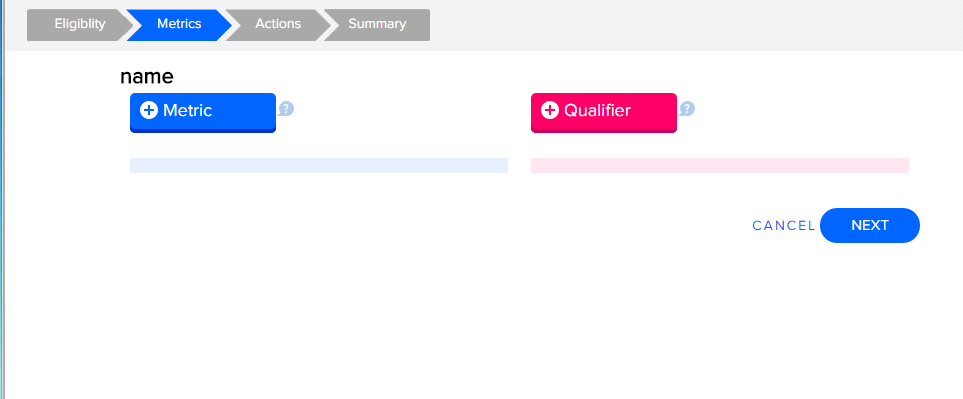
- Click Metric.
- Locate and click the metric you want to use.
- Click Choose for the Calculation the rule should use. Examples are provided for each formula to help you select the best option for your situation.
- Configure the Range Calculation Setup based on the type of Calculation you chose in the previous step. Use the onscreen examples for guidance.
- Click Done.
- (OPTIONAL) Click Qualifier to select one or more qualifiers for the rule. For example, you may create a rule that rewards agents with lower average handle time (AHT). However, you do not want call quality to suffer as agents try to end calls more quickly. You can attach a quality-related qualifier to the rule to lessen the chance of this happening.
- (OPTIONAL) Repeat the steps in this section if you need to add more metrics and qualifiers. Multiples are supported for each.
- Click Next.
- Review the summary of selected components for the rule and then click Next.
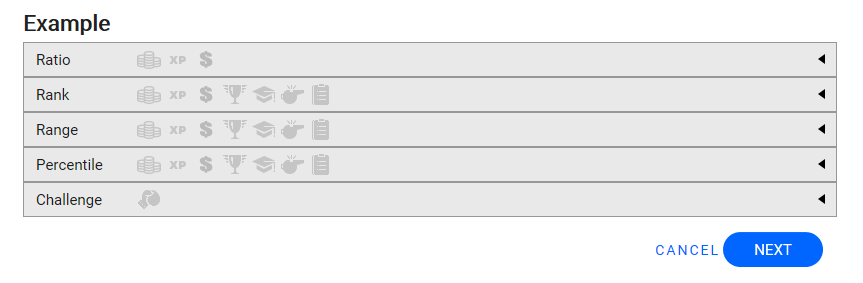
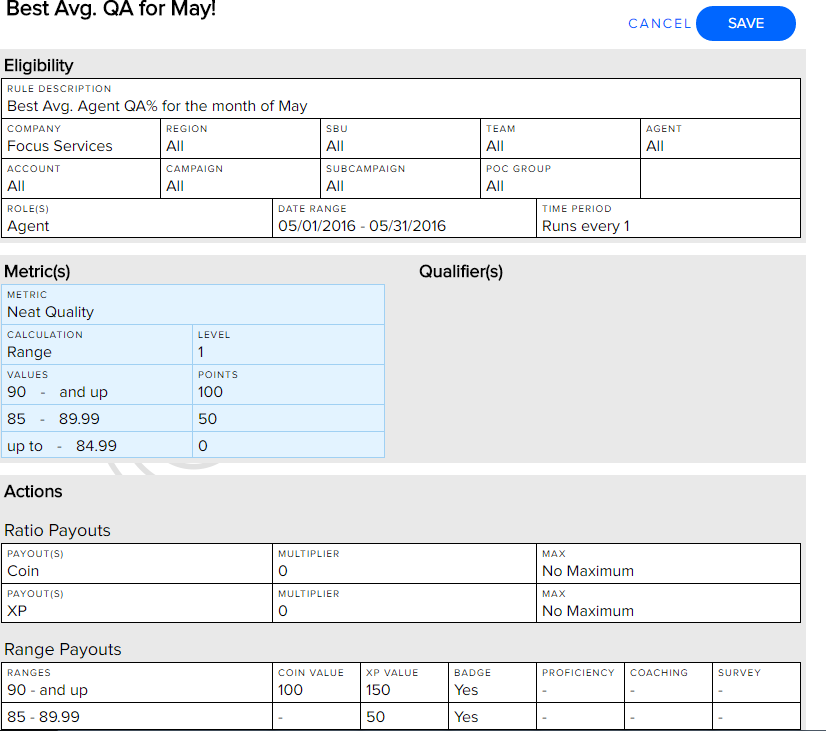
Enter Actions
The Actions page allows you to configure actions that happen when the rule conditions are met. You may configure all or only some of these categories, depending on the rule and its purpose. The options differ for each of the categories.

The Ratio category allows you to configure payout of rewards associated with the rule. You can configure payouts in inView coins, in experience points (XP), in real currency, or in a combination of these.
- Click the Ratio bar.
- Type a numeric Multiplier for each payout option you want to configure. For example, if you enter a Multiplier of 5, the payout will be five times the rule-generated score.
- Type a numeric Max value for each payout option you want to configure. You can leave this field blank if you do not want to set a maximum payout for the rule.
- Coin Payouts Only: Configure a delayed payout by typing a numeric value in the Amount field and selecting a value from the When drop-down list of these choices: Now, Days, Weeks, or Months. For example, if the coin payout should happen two weeks after the rule condition is met, enter 2 in the Amount field and select Weeks from the When drop-down list. The default setting for the When field is Now (that is, payout is not delayed).
- Click another category to configure additional actions or, if you are finished configuring actions, click Next.
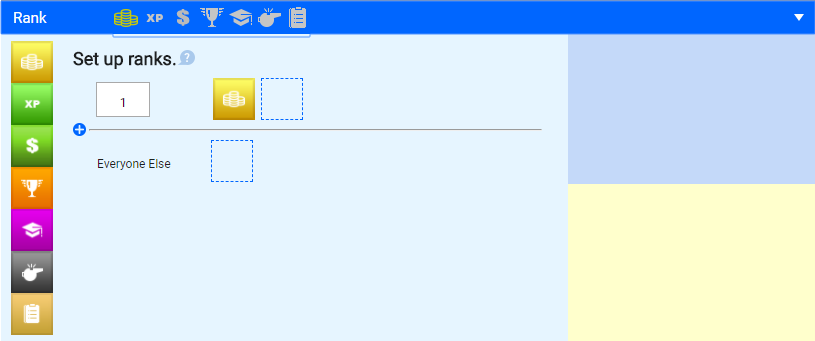
The Rank category allows you to configure actions for rules that result in ranked finishers (that is, a winner, 2nd place, 3rd place, and so forth). You can configure different actions for different ranks. For example, a rule related to keeping AHT at or below a goal level might provide positive actions for the top three finishers and remedial actions for everyone else.
- Click the Rank bar.
- Click-and-drag one or more actions from the left palette to the empty boxes to select actions for the top finisher. Each option includes different settings for further configuration. Available options are:
- Coins — Type a numeric value in the Coin Value field to award inView coins. If you want to configure a delayed payout, type a numeric value in the Amount field and select a value from the When drop-down list of these choices: Now, Days, Weeks, or Months. The default setting for the When field is Now (that is, payout is not delayed).
- XP — Type a numeric value in the XP Value field to award experience points.
- Currency — Type a numeric value in the Currency Value field to award a bonus or similar payout.
- Badge — Click Select Badge to award an existing badge or create a new badge. Type a Level Name for the badge. To configure a Badge Name and Badge Description that apply to all badge actions for the rule, type values in those fields. The default Badge Name is the name of the rule.
- Proficiency — Select one or more skills from the first drop-down list and then select a level from the Proficiency Change drop-down list. To configure a Schedule that applies to all proficiency changes for the rule, click the calendar icon, select a Schedule Type, and set a Frequency using the date and time options.
- Coaching — Type a value in the Coaching Title field to configure automatic coaching sessions. Select a Coaching Form from the drop-down list. To configure settings that apply to all coaching actions for the rule, select values from the drop-down lists for Objective Date Range, Coaching Level, and Coaching Role.
- Survey — Select a Survey Form from the drop-down list.
- Click the Add icon (indicated by a plus sign in a blue circle) to configure another numbered rank, and repeat the previous step for that rank. Repeat this step until you have finished adding numbered ranks.
- Configure actions for Everyone Else using the action palette and options described earlier in this task.
- Click another category to configure additional actions or, if you are finished configuring actions, click Next.

The Range category allows you to configure actions for rules that result in ranges of finish. You can configure different actions for different ranges. For example, a rule related to a contest for upselling 100 products in a month might provide different levels of positive action for agents selling 90+ products, 80-89 products, and 70-79 products, and remedial actions for everyone else.
- Click the Range bar.
- Click and drag one or more actions from the left palette to the empty box(es) to select actions for the top finisher. Each option includes different settings for further configuration. Available options are:
- Coins — Type a numeric value in the Coin Value field to award inView coins. If you want to configure a delayed payout, type a numeric value in the Amount field and select a value from the When drop-down list of these choices: Now, Days, Weeks, or Months. The default setting for the When field is Now (that is, payout is not delayed).
- XP — Type a numeric value in the XP Value field to award experience points.
- Currency — Type a numeric value in the Currency Value field to award a bonus or similar payout.
- Badge — Click Select Badge to award an existing badge or create a new badge. Type a Level Name for the badge. To configure a Badge Name and Badge Description that apply to all badge actions for the rule, type values in those fields. The default Badge Name is the name of the rule.
- Proficiency — Select one or more skills from the first drop-down list and then select a level from the Proficiency Change drop-down list. To configure a Schedule that applies to all proficiency changes for the rule, click the calendar icon, select a Schedule Type, and set a Frequency using the date and time options.
- Coaching — Type a value in the Coaching Title field to configure automatic coaching sessions. Select a Coaching Form from the drop-down list. To configure settings that apply to all coaching actions for the rule, select values from the drop-down lists for Objective Date Range, Coaching Level, and Coaching Role.
- Survey — Select a Survey Form from the drop-down list.
- Click the Add icon (indicated by a plus sign in a blue circle) to configure another range, and repeat the previous step for that range. Repeat this step until you have finished adding ranges.
- Click another category to configure additional actions or, if you are finished configuring actions, click Next.
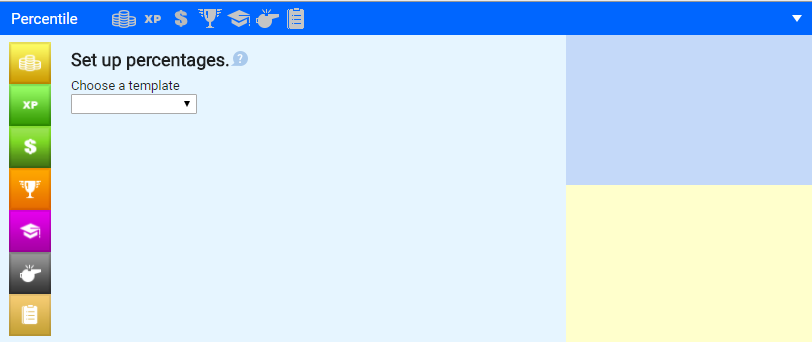
The Percentile category allows you to configure actions for rules based on the percentile ranks of finishers. You can configure different actions for different percentiles. For example, a rule related to a contest for upselling products might provide different levels of positive action for the top 90% of agents, agents who finish in the 80th-89th percentile, and agents who finish in the 70th-79th percentile, and remedial actions for everyone else.
- Click the Percentile bar.
- Select a template from the drop-down list. Templates are available for Quartiles (that is, 75-100%, 50-74.99%, 25-49.99%, and 0-24.99%) and 10-80-10 (that is, top 10%, middle 80%, bottom 10%). You can also Choose your own (that is, configure your own percentile groupings).
- Click and drag one or more actions from the left palette to the empty box(es) to select actions for each percentile grouping. Each option includes different settings for further configuration. Available options are:
- Coins — Type a numeric value in the Coin Value field to award inView coins. If you want to configure a delayed payout, type a numeric value in the Amount field and select a value from the When drop-down list of these choices: Now, Days, Weeks, or Months. The default setting for the When field is Now (that is, payout is not delayed).
- XP — Type a numeric value in the XP Value field to award experience points.
- Currency — Type a numeric value in the Currency Value field to award a bonus or similar payout.
- Badge — Click Select Badge to award an existing badge or create a new badge. Type a Level Name for the badge. To configure a Badge Name and Badge Description that apply to all badge actions for the rule, type values in those fields. The default Badge Name is the name of the rule.
- Proficiency — Select one or more skills from the first drop-down list and then select a level from the Proficiency Change drop-down list. To configure a Schedule that applies to all proficiency changes for the rule, click the calendar icon, select a Schedule Type, and set a Frequency using the date and time options.
- Coaching — Type a value in the Coaching Title field to configure automatic coaching sessions. Select a Coaching Form from the drop-down list. To configure settings that apply to all coaching actions for the rule, select values from the drop-down lists for Objective Date Range, Coaching Level, and Coaching Role.
- Survey — Select a Survey Form from the drop-down list.
- Click the Add icon (indicated by a plus sign in a blue circle) to configure another percentile grouping, and repeat the previous step for that grouping. Repeat this step until you have finished adding groupings.
- Click another category to configure additional actions or, if you are finished configuring actions, click Next.
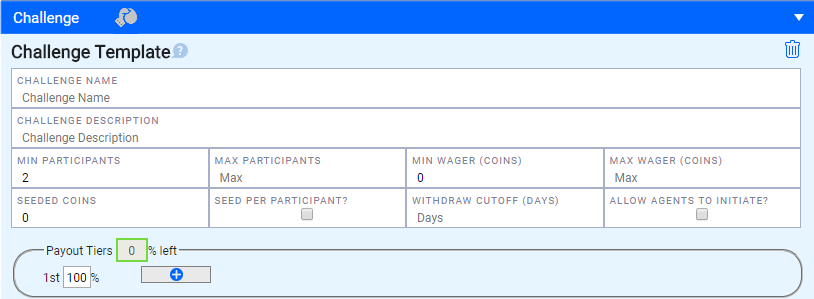
The Challenge category allows you to give agents the ability to challenge each other in regard to the rule, and to configure the parameters for those challenges.
- Click the Challenge bar.
- Type a Challenge Name.
- Type a Challenge Description.
- Type numeric values for Min Participants and Max Participants to specify how many agents can compete in a single challenge.
- Type numeric values for Min Wager and Max Wager. Agents wager using inView coins to "buy in" to challenges. The pot is distributed to the challenge winners.
- Type a numeric value in Seeded Coins if you want to provide an organizational contribution to the challenge. This value is added to the pot for distribution. For example, you might type 500 as a starter value for the challenge pot.
- Select the Seed Per Participant checkbox if you want to increase the Seeded Coins value based on the number of agents in the challenge. For example, you might type 50 in the Seeded Coins field and select this checkbox. If five agents join the challenge, the organizational contribution would be 250 coins.
- Type a numeric value in Withdraw Cutoff if you want to prevent agents from withdrawing from challenges after a certain number of days.
- Select the checkbox if you want to Allow Agents to Initiate the challenge.
- Configure the Payout Tiers for distribution of the challenge pot. The default setting is for 100% of the pot to go to first place. Click the Add icon (indicated by a plus sign in a blue circle) to divide the pot among other finishers. For example, you might configure three payout tiers and award the pot in a breakdown of 50%, 35%, and 15%.
- Click another category to configure additional actions or, if you are finished configuring actions, click Next.
Summary
- Review the configuration of your rule. If you need to make any changes, you can revisit the Eligibility, Metrics, or Actions sections by clicking the section name at the top of the page.
- When you are finished configuring your rule, click Save.


