The Surveys feature enables you to create and distribute surveys to your agents or other employees with inView access. For example, you might use surveys to:
- Let agents provide feedback on their coaching sessions or company training programs.
- Poll your agents regarding a proposed contact center change.
- Gather job satisfaction input prior to annual reviews.
Survey Form Page
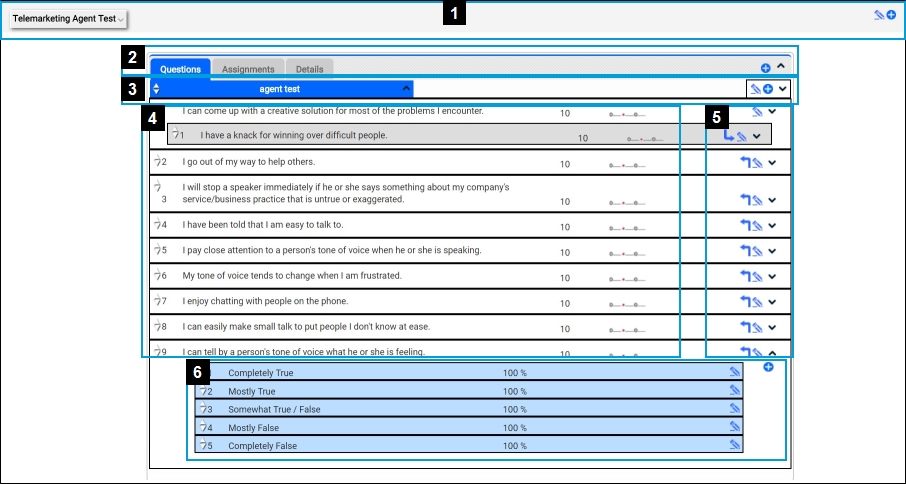
- 1—Survey Options
-
- The drop-down on the left shows a list of existing survey forms.
- The Edit Form icon on the right (indicated by a blue pencil) opens the Edit Form dialog box which allows you to change the name and description of the survey.
- The Add Form icon on the right (indicated by a blue circle with a plus sign) creates a new survey form.
- 2—Survey Form Bar
- This bar contains elements to edit and control the form overall. The following items explain each element:
- Questions — Displays the subform(s) and corresponding questions and answers.
- Assignments — Displays which agents and groups to which this survey is assigned.
- Details — Controls the time frame for which the survey is open, and whether or not the survey is opened or closed.
- Add Subform Icon — Allows you to add additional subforms by clicking this icon (indicated by a blue circle with a plus sign).
- 3—Subform Bar
- Each subform has a bar which enables you to add questions, edit details such as the name or description, and expand/ collapse the subform.
- 4—Question Details
- This area contains the following elements:
- Move Question Icon — Moves the question by clicking and dragging the icon (indicated by an up and down arrow) up or down in the list. Your pointer will change into a compass as you hover over the arrows.
- Question field — Displays the question.
- Question Weight — Displays each question's weight, which affects the importance of any given question and its affect towards the total score.
- Type of answer — Displays the type of answer for any given question to the right of the question weight, such as a text box or multiple-choice radio buttons.
- 5—Edit Icons
- The icons on the right side of each question allow you to perform the following:
- Make Dependent Icon — Makes a question dependent on the preceding question after clicking the icon (indicated by a right-angle arrow).
- Edit Question Icon — Opens the Edit Question dialog box to change elements of the question, such as the name or description, after clicking the icon (indicated by a blue pencil).
- Expand/Collapse Icon — Shows or hides the answer details drop-down after clicking the icon (indicated by an angle bracket).
- 6—Answer Details
- Click the Expand/Collapse Answers icon (indicated by an angle bracket) to display answer details for each question. The following items explain elements of the answer details drop-down.
- Move Answer Icon — Moves the answer by clicking and dragging the icon (indicated by an up and down arrow) up or down in the list. Your pointer will change into a compass as you hover over the arrows.
- Answer field — Displays the answer option.
- Answer Percent — Displays how often this answer is selected.
- Edit Answer Icon — Opens the Edit Answer dialog box to change elements of each answer, such as the name of position, by clicking the icon (indicated by a blue pencil).
- Add Answer Icon — Allows you to add additional answers by clicking this icon (indicated by a blue circle with a plus sign).


