Required security profile permissions: Calling List Create
A contact might request that an agent call back at a certain date and time; they may even require the same agent. You can create dispositions that enable agents to schedule callbacks either for themselves or any agent in their outbound dialer skillClassification used to facilitate the delivery of contacts; assigned to agents based on abilities, specialties, and knowledge. You can also schedule callbacksHolds a customer's place in queue and automatically calls the customer when they move to the front of the queue. when you revise a calling list and upload it through Central. To do so, you must specify the date and time of the callback, the number of minutes after the initial callback time after which the dialer stops attempting to call the record, and optionally the agent who should handle the call. You must then map that information during the calling list upload process.
For performance reasons, the system limits the number of callbacks you can schedule via Central upload or Proactive XS import per 15-minute period based on the number of agents logged in to the skill. If no agents are currently logged in to the skill, the limit is 50 timed call requests. Every agent who logs in to the skill increases the limit per 15-minute period by 100 requests. When you upload or import a batch of callbacks with more than the allowed limit in a 15-minute period, Personal Connection (PC) rejects the file. Agents can still schedule callbacks for a maxed-out time period.
Note that PC delivers all callbacks as confirmation required. The dialer delivers a notification to an agent when the time for the callback arrives, and the agent must accept the call before PC dials it.
-
Create a new calling list or open an existing one with the contacts for whom you want to schedule callbacksHolds a customer's place in queue and automatically calls the customer when they move to the front of the queue..
- For those rows that define timed call requests, verify that they contain a single phone number. The system rejects timed call requests with multiple phone numbers.
-
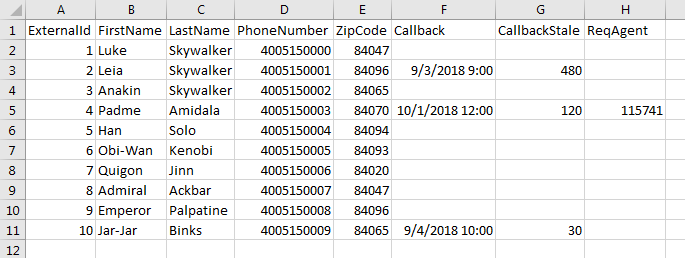
Add two new columns: one to contain the date and time of the callbacks and one to contain the number of minutes the call stays in queue before returning to list management. You might also want to create a third column to request a specific agent to take the call. Give each new column a unique, descriptive name.
See Call Request Date/Time for details about the format required for the callback date/time field. It is a best practice to schedule callbacks on the hour's five-minute intervalsA period between points, limits, or events, such as dates or times. (2:00 PM, 2:05 PM, or 2:10 PM).
It can take a minute after an agent logs in for the dialer to deliver an agent-specific timed call request.
-
Fill in the new columns for each contact you want the dialer to call back. In the following example, the dialer attempts to call Padme Amidala on October 1, 2015 at 12:00 PM. If it cannot deliver the call to the target agent, the dialer holds the record in the queue for the agent for 120 minutes.
-
Click File → Save As to save your updated calling list.
- Upload the calling list and map the callback columns to the correct fields.
Click Personal Connection → Lists → Calling.
Click Select File.
Read the agreement and click Accept.
Type a unique name in the List Name field. Select the PC skillClassification used to facilitate the delivery of contacts; assigned to agents based on abilities, specialties, and knowledge that you want to dial these contacts from the Skill drop-down. If you want to set an expiration date for all the contacts in this calling list, use the date picker in the Expired Date field.
Click Next.
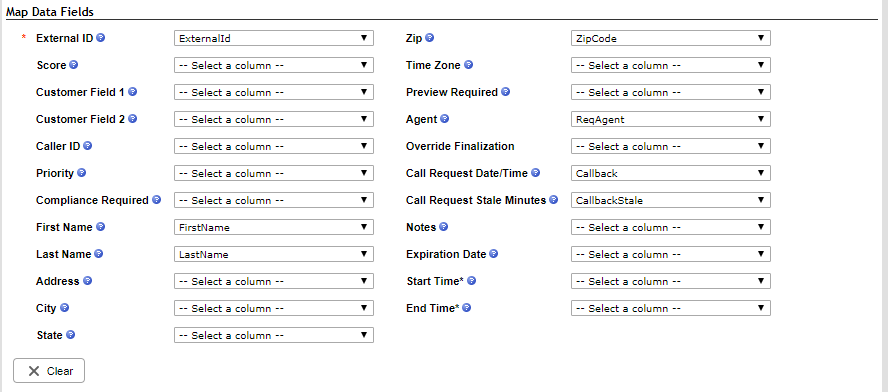
If you used the first row of your calling list to label the columns, select the Header checkbox. Verify the columns mapped to the correct fields and correct any errors. Map any columns that the system did not automatically map. Specifically, map the new call back columns to the Call Request Date/Time, Call Request Stale Minutes, and Agent fields.
Click Next.
When the list processing completes, click Done.
 (OPTIONAL) Release Agent-Specific Calls
If you uploaded agent-specified timed call requests, use the Release Agent-Specific Calls field to specify what occurs when the agent requested no longer has the necessary skill to take the call.
Click Routing → Skills.
Locate the PC skill you want to modify. Click the skill to open it.
Click the Parameters tab.
Locate the Retry Settings section and click Configure or Edit.
In the Callback Settings section, locate Release Agent-Specific Calls. Select the checkbox if you want agent-specific calls released to the skill when a requested agent no longer has the required skill to take the call, or clear the checkbox if you want to finalize the record of a callback when the requested agent no longer has the required skill to take the call.
Click Done.