SMS Messaging
Required security profile permissions:Skills Edit, Calling List Create
You can set the allowable call or text time for Personal Connection (PC) on a per-skillClassification used to facilitate the delivery of contacts; assigned to agents based on abilities, specialties, and knowledge basis, per-record basis, or a per-destination (that is, individual phone number), basis.
To prevent dialing outside dialing curfew, PC does not recognize the allowable time range constraints unless you first apply a time zone.
Set the Allowable Time Range per Skill
Required security profile permissions: Skills Edit
-
Click Routing → Skills.
-
Locate the skill for which you want to set an allowable dialing time range. Click the skill to open it.
-
Click the Parameters tab. Locate the Cadence Settings and click Configure or Edit.
-
If you have already configured a cadence, click the time constraints link beside the first entry. If you have not already set up a cadence, do so now, and then click the time constraints link.
-
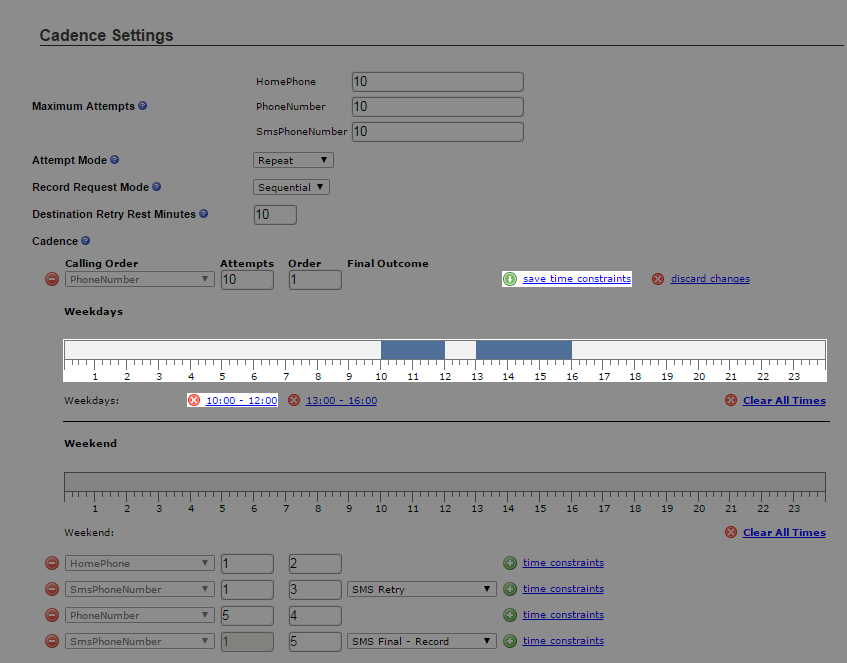
In the number bar below Weekdays, click and hold just above the number corresponding to the hour you want dialing to begin. Drag your cursor to the right and when you reach the number corresponding to the hour you want dialing to end, release the click. A time range appears below the bar. If you want to add other time ranges to weekdays for this phone number, repeat the process. Click save time constraints. The example in the preceding image allows calling on weekdays between 10:00 AM and 12:00 PM and between 1:00 PM and 4:00 PM.
To remove an allowable time range, click the corresponding red X or link below the bar. For example, if you wanted to remove the 10:00AM-12:00PM range from the example in the following image, you would click the 10:00 - 12:00 link.
-
Repeat the preceding step on the Weekend number bar to configure the allowable dialing time range for weekends.
- Repeat steps 6 and 7 for all cadence entries to which you want to apply dialing range constraints.
- Click Done.
Setting the Allowable Time Range per Record
Required security profile permissions: Calling List Create
The following instructions assume that each record has a single phone number or that you want the allowable time range to apply to all phone numbers in the record.
-
Create a calling list with a start time and an end time column. Add a value for each record for which you want to configure an allowable calling time range. Create a method for assigning a time zone to each record, either by directly assigning a time zone, by adding a zip code or other location information, or by setting a default time zone for records without time zones as you upload the list.
The required format of the Start Time and End Time fields is an integer indicating a number of minutes after midnight. If you want calls to the number to begin at 9:00 AM and end at 6:00 PM, the values would be 540 and 1080, respectively.
- Upload the calling list.
-
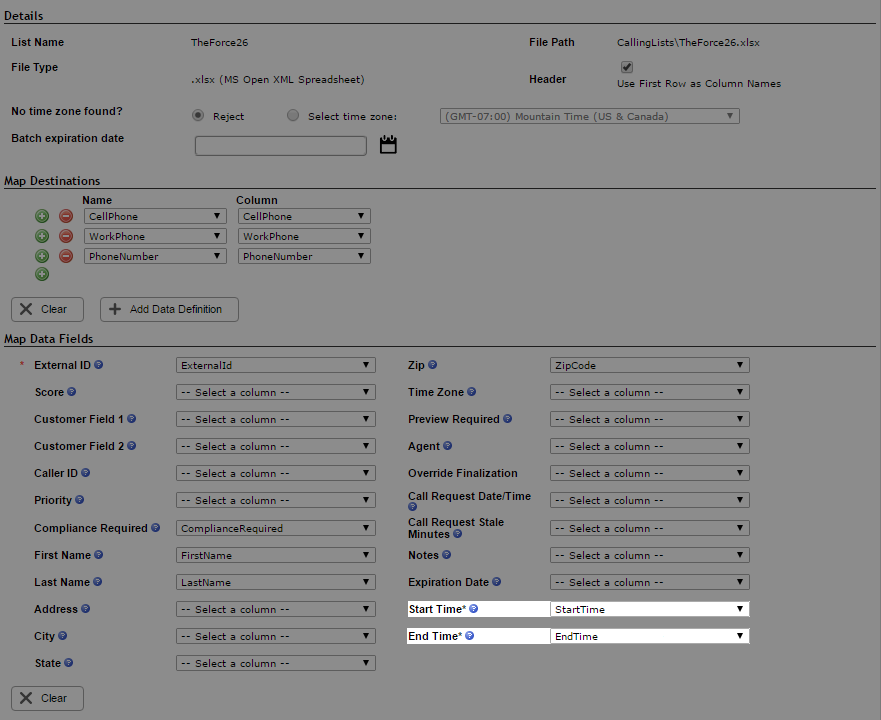
As you map the calling list to system fields, ensure that you map the Start Time* and End Time* fields to the correct columns.
- Complete the calling list upload wizard.
Setting the Allowable Time Range per Destination
Required security profile permissions: Calling List Create
The following instructions assume your calling list contains multiple phone numbers for a single record and that you want an individual allowable calling time range for each phone number.
-
Click Personal Connection → Lists → Custom Data Definitions.
- Create a new phone number type with associated start and end time fields.
Create a start time field for the new phone type. To do so, click Create New. Set the Type to Integer. Give it a descriptive Field Name that, as a best practice, indicates it is a start time field and contains the phone type with which it is associated. For example, if you are creating a new cell phone field you might call it CellStartTime so you can easily tell the field contains the start time of the cell phone. You can optionally select Value Required if you want to require that all records contain a value for this field. Note that PC ignores default values for start and end time fields. Click Add.
Create an end time field for the new phone type. To do so, repeat steps A through C, giving the field a name that indicates it is the end time field of the new phone type.
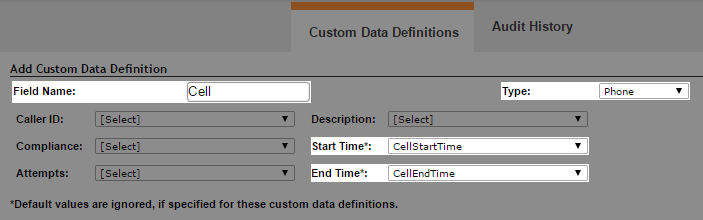
Click Create New and set the Type to Phone if you want PC to use the number for phone calls or SMSPhone if you want PC to use the number for text messaging. Give the field a descriptive Field Name. In the Start Time drop-down, select the start time field you created for this phone field. In the End Time drop-down, select the end time field you created for this phone field.
(OPTIONAL) Set default start and end times for phone numbers that do not have values for the start and end time fields in the calling list. To do so, follow the instructions in the Set the Allowable Time Range per Skill section.
- Repeat the previous step for each phone number you want to include for each record.
-
Create a calling list with columns for each phone type and start and end times for each phone type. When you create a start and end time, the value must be an integer indicating the number of minutes after midnight that the dialer should start or end attempts to reach the destination. For example, to make the start time 8:00 AM, you would multiple the hour (8) by 60 and set the value to 480. To make the end time 12:00 PM, you would multiply the hour (12) by 60 and set the value to 720.
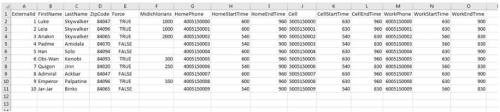
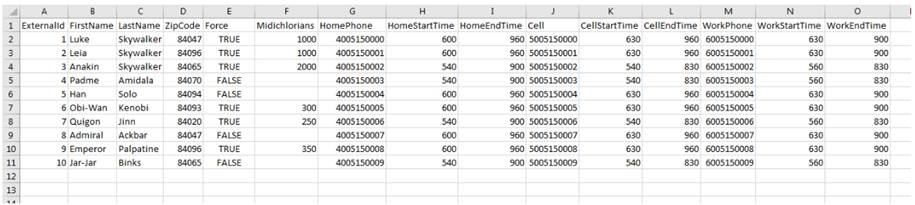
The following calling list example contains columns for a cell phone, work phone, and home phone, plus a start time column and an end time column for each one.

-
Upload the calling list. When you map the columns to system and custom fields, ensure that all the custom phone number fields you created mapped correctly in the Map Destinations section. In the Map Data Fields section, make sure that any mappings for the Start Time and End Time fields are what you intended. In the Map Custom Data section, verify that the start and end time columns for each phone number type mapped to the correct custom fields.
- Complete the calling list upload wizard.


