Roles allow you to control what users can do in the inView system. Through careful role design and assignment, you can ensure that users are able to perform all the tasks they need to perform, without having access to any pages or information they should not see.
You must create and configure inView roles before you create users, since you will need to assign roles to your new users.
Roles Page
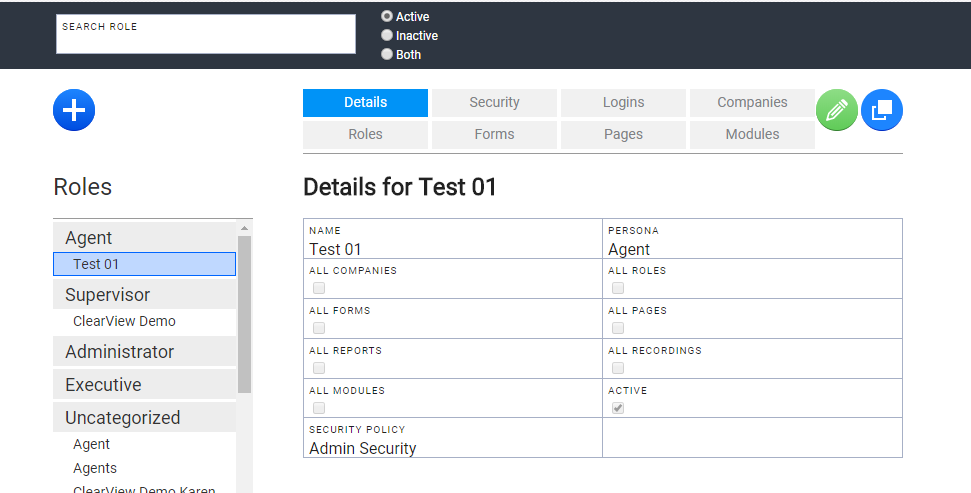
By default, the Roles page (Account → Roles) opens on the Details tab. At the top of the page, you can use the filtering options to limit the list shown under Roles to Active, Inactive, or Both. You can also search for a specific role by name. The Details tab shows the following information about the role:
- Name
- The name of the role, as others will see it in the system.
- Persona
- The persona assigned to the role. Each role is attached to an Agent, Supervisor, Administrator, or Executive persona. Personas help categorize roles and users, which streamlines items like messaging and new features.
- All Companies
- When selected, users with this role have access to all companies in your system. If you do not have this level of access yourself, the checkbox is disabled as you cannot grant others access that you do not also have.
- All Roles
- When selected, users with this role have access to all roles in your system. If you do not have this level of access yourself, the checkbox is disabled as you cannot grant others access that you do not also have.
- All Forms
- When selected, users with this role have access to all coaching and survey forms in your system. If you do not have this level of access yourself, the checkbox is disabled as you cannot grant others access that you do not also have.
- All Pages
- When selected, users with this role have access to all pages in the inView web portal. If you do not have this level of access yourself, the checkbox is disabled as you cannot grant others access that you do not also have.
- All Reports
- When selected, users with this role have access to all inView reports. If you do not have this level of access yourself, the checkbox is disabled as you cannot grant others access that you do not also have.
- All Recordings
- This feature is not used with inView for NICE inContact
- All Modules
- When selected, users with this role have access to all inView modules. If you do not have this level of access yourself, the checkbox is disabled as you cannot grant others access that you do not also have.
- Active
- When selected, the role is active in the system. By default, new roles are set to active. When you deactivate a role, the information is no longer visible in the web portal, but is still present in the inView database.
- Security Policy
- The security policy that applies to the role. Choose from a drop-down list of security policies in your system.
Create a Role
- Click Account → Roles.
- Click the Add icon (indicated by a plus sign in a blue circle).
- Type the Name of the new role.
- Configure the Details tab settings by completing the fields described in the previous section.
- Click Save.
- (OPTIONAL) Fine-tune the privileges associated with this role by editing one or more of these additional tabs. The Logins, Roles, and Forms tabs are not editable.
 Security Tab
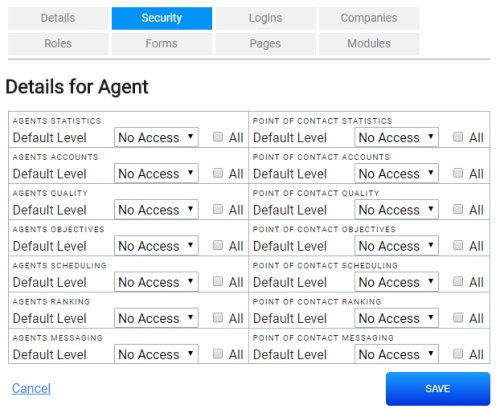
- Click the Security tab.
- Click the Edit icon (indicated by a pencil in a green circle).
- For each of the categories listed, a new role is granted the default access level. To change that access level, select an option from these categories presented in a drop-down list: No Access, Agents, Teams, Floors, Regions, or Company. If you want the role to have access to all entities in the category you selected, select the All checkbox.
- Click Save.
Companies TabIf your organization manages multiple companies using inView, you can control which companies the role can view.
- Click the Companies tab.
- Click the Edit icon (indicated by a pencil in a green circle).
- Under View, select the checkbox for any company to which the role should have access. Only companies already available in your system appear in the list.
- Click Save.
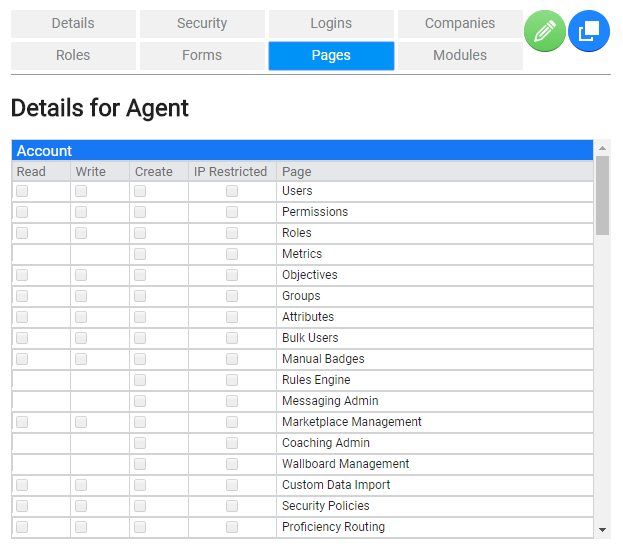
Pages Tab
The Pages tab allows you to control access to every page in the inView web portal. It also lets you specify what users with the role can do on the pages to which they have access. If a role should not have access to a particular page, do not select any options for that page. Pages related to recordings are not used.
- Click the Pages tab.
- Click the Edit icon (indicated by a pencil in a green circle).
- For each of the pages listed, select one or more checkboxes to specify privileges for this role in relation to that page. Privilege options are:
- Read — Users can see the content on a page but not perform any actions on the page.
- Write — Users can see and edit existing content on a page.
- Create — Users can create new entities on the page.
- IP Restricted — Users can exercises any other privileges granted for the page, but only if they are using a computer with an allowed IP address.
- Click Save.
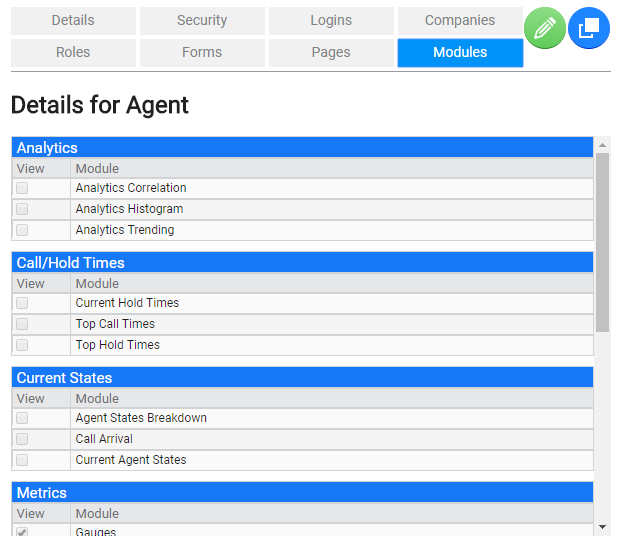
Modules Tab
The Modules tab allows you to control which modules can be added to dashboards by a user with the role. Data displayed by the module is determined by the Level setting in the user's account.
- Click the Modules tab.
- Click the Edit icon (indicated by a pencil in a green circle).
- Under View, select the checkbox for any module to which the role should have access.
- Click Save.

Edit a Role
- Click Account → Roles.
- Use the filtering tools described in the Roles Page section to find the role you want to edit.
- Click the role in the roles list to open it on the Details tab.
- Click the Edit Role button (indicated by a green circle with a pencil).
- Make changes to the role settings. Refer to the previous section for information about the different tabs.
- Click Save.


