Required security profile permissions: inContact Interaction Analytics Pro Admin
You can create and modify workspace setsA set of multiple workspaces grouped as a reusable template. When you first save a topic, you choose a dashboard set as the starting set of dashboards for the topic. used as templates when you create or modify topicsA set of voice, email, or chat transcriptions from your contact center that spans a specific period of time and matches your specified filter criteria.. Modifying dashboard sets does not affect existing topics unless you modify them to select the new or updated workspace set. Modifications include adding, removing, and renaming workspacesThe named view of one or more analysis widgets., adding and removing widgetsA graphical chart with data that meets specified filter criteria to help contact center supervisors and managers understand trends in the contact center. from a workspace, and resizing and moving widgets in the workspace. Changing a workspace set template does not change the workspace sets in the topic where it was previously applied.
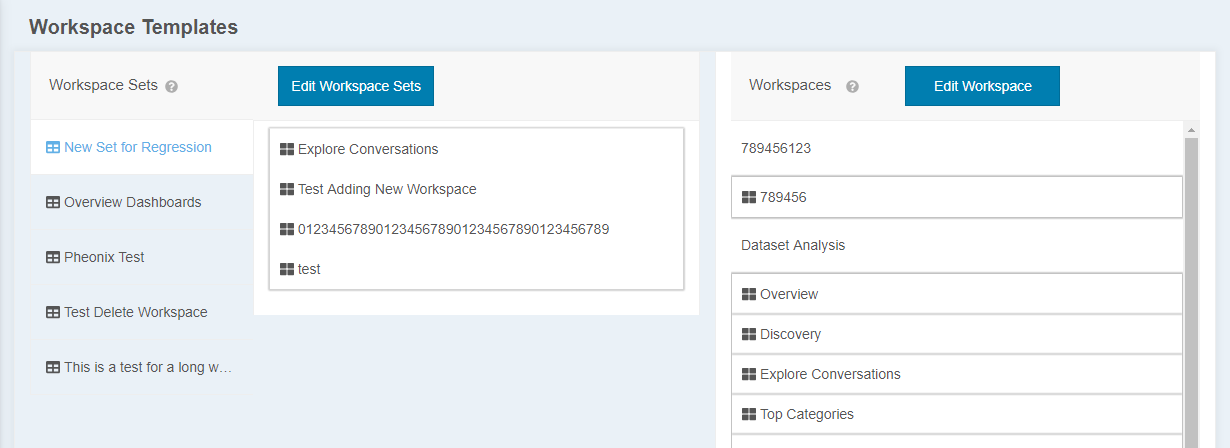
- Click Settings → Workspace Templates.
- On the right side of the page under Workspaces, click Edit Workspace.
-
The Edit Workspace page opens and enables you to perform the actions documented on this online help page.
- When you finish editing the topic workspaces, click Done to save your changes or Cancel to discard them.
Create a Workspace Group
A group is a folder that helps you to organize your workspaces. You can create groups to hold certain types of workspaces to make finding workspaces easier as you create or edit workspace sets.
-
Click Add Group. The new group appears on the bottom of the workspace pane on the left with the name New Group.
- Rename the new group.
- Add workspaces to the group by moving existing ones or by creating new ones.
Create a Workspace
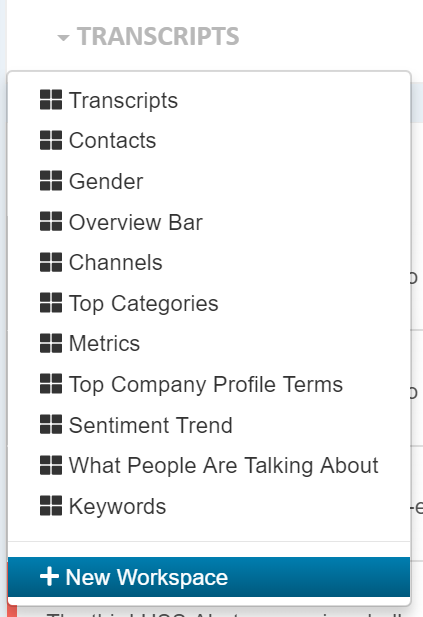
- Click the name of the current workspace located in the upper left corner.
-
Click New Workspace.
-
To create a blank workspaceThe named view of one or more analysis widgets., click Blank. To create a workspace using an existing workspace as a template, click the name of the workspace you want to use as a template. If you have a long list of workspaces, use the search bar to help filter the list.
- Rename the new workspace.
-
Add widgets to the workspace. You can also move, resize, or remove existing widgetsA graphical chart with data that meets specified filter criteria to help contact center supervisors and managers understand trends in the contact center. from the Workspace.
Delete a Workspace
- Open the workspaceThe named view of one or more analysis widgets. you would like to delete.
-
Click Edit Workspace.
-
Click Delete Workspace.
Rename a Workspace or Group
- Open the workspaceThe named view of one or more analysis widgets. you would like to rename.
-
Click Edit Workspace.
-
Click Rename Workspace.
Add a Widget to a Workspace
-
Open the workspaceThe named view of one or more analysis widgets. in which you want to add the new widgetA graphical chart with data that meets specified filter criteria to help contact center supervisors and managers understand trends in the contact center..
- Click Edit Workspace.
-
Click Add Widget. Select the widget you want to add from the list in the Widgets pane on the right. You can click the information icon next to a widget title to learn more about what the widget does, or see Workspace Widgets for more information.
The widget you selected appears in the workspace design area.
- Move and resize the widget so it appears where and how you want it in the workspace.
-
If the widget you selected has configuration options and you want to customize it, click the gear icon in the top right corner of the widget.
The configuration options are different for each widget. For instructions for configuring the widget you selected, see Edit Widget Settings.
- Click Done to save your changes.
Edit Widget Settings
You can modify settings for the Overview Bar Widget, Metrics Widget, and Keywords Widget, including the title that appears above the chart, filters applied to the chart, the color of the bars, the amount of data displayed, or the metrics displayed.
- Open the workspaceThe named view of one or more analysis widgets. in which you would like to edit the widgets.
- Click Edit Workspace.
- Click the gear icon in the top right corner of any of the three valid widgetsA graphical chart with data that meets specified filter criteria to help contact center supervisors and managers understand trends in the contact center..
- Make modifications according to the instructions for the widget type below.
- Click OK or Done to save your changes to Cancel to discard them.
Overview Bar Widget
You can customize which of the three sections appear in the Overview Bar Widget. To include the section in the widget, select the corresponding checkbox. To remove the section from the widget, clear the corresponding checkbox.
Metrics Widget
You can customize the Metrics Widget to display whatever NICE inContact metric data you want. You can change the title, the color of the bars in the chart, and filter by sentiment or metric thresholds. Open the following drop-down for detailed information about all settings you can apply to the Metrics Widget.
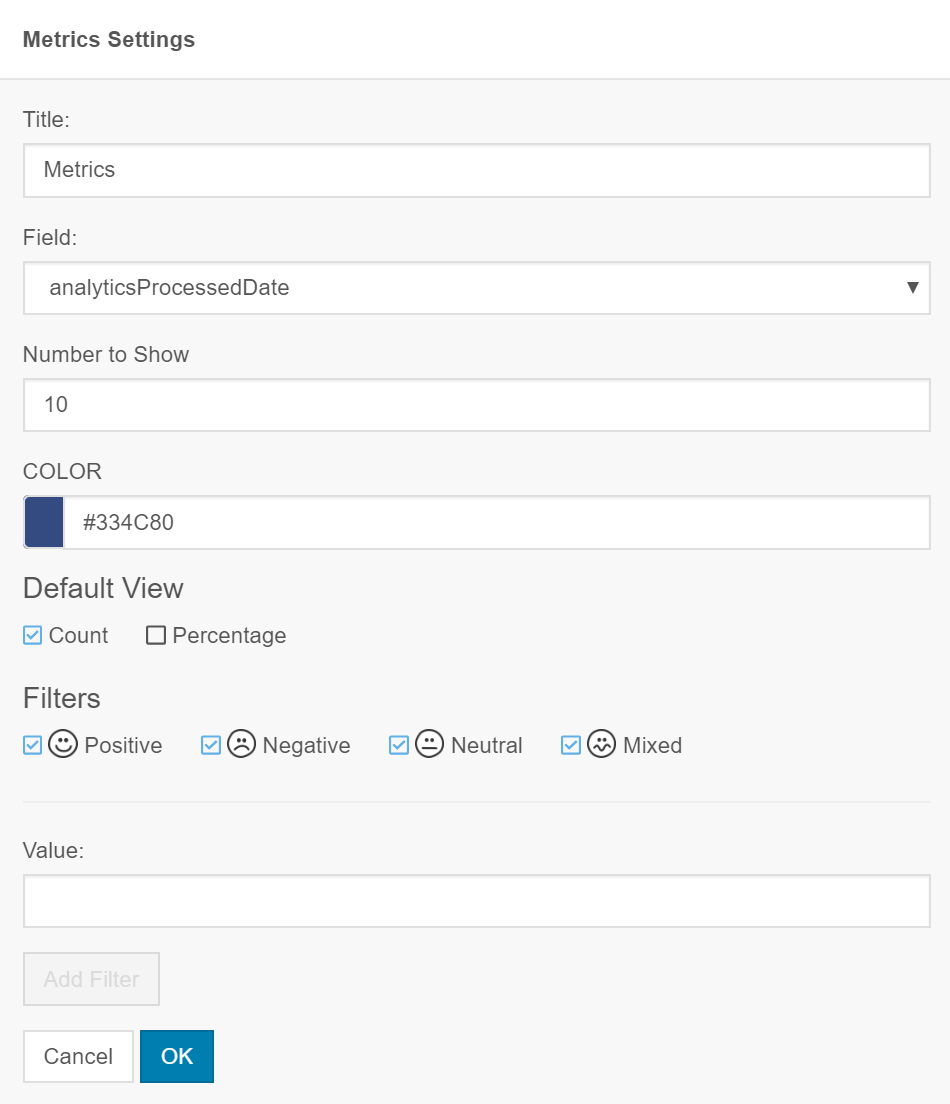
- Title
- The title that appears along the top of the widget. By default, the Title is Metrics.
- Field
-
The NICE inContact metric you want to use to filter the data displayed in the widget. It is one of:
- abandoned — The number of contacts that abandoned the interaction (true) and the number that did not (false).
- abandonSeconds — The number of seconds an interaction lasted before it was abandoned. 0 indicates that no abandon occurred.
- ACWSeconds — The number of seconds agents spent on ACWAfter Call (or Contact) Work; state that allows an agent to complete work requirements after finishing an interaction. for the interaction.
- agentID — The number of contacts handled per agent. Agents are identified by numeric ID.
- agentSeconds — The number of seconds the agent spent on the interaction.
- analyticsProcessedDate — The number of interactions ingested into the Analytics system for analysis by date.
- businessUnitID — The number of interactions that occurred in each business unitFile format associated with Microsoft Excel; may also be expressed as .xlsx.
- callbackTime — The number of contacts by the length of time spent waiting for a callbackHolds a customer's place in queue and automatically calls the customer when they move to the front of the queue. after requesting one.
- campaignID — The number of contacts handled by a campaignA grouping of skills used to run reports.. Campaigns are identified by numeric ID.
- campaignName — The number of contacts handled by a campaign. Campaigns are identified by name.
- combinedTranscriptID —The number of contacts per ID for the voice transcript that shows customer and agent speech.
- confSeconds — The number of seconds agents spent conferencing in the interaction.
- contactID — The number of contacts by contact ID.
- contactStart — The number of contacts that occurred at the same time.
- dateACWWarehoused —
- dateContactWarehoused — The number of contacts that started at certain time.
- dispositionNotes — The number of contacts where an agent assigned the same dispositionResult that the agent or system assigns to the contact when the interaction ends. notes.
- firstName — The number of contacts handled by agents. Agents are identified by first name, so agents sharing the same first name are combined.
- fromAddr — The phone number, email address, or IP address of the agent who handled the call, email, or chat interaction, respecitively.
- holdCount — The number of contacts placed on hold.
- holdSeconds — The number of seconds contacts spent on hold. 0 indicates the contact was not placed on hold.
- isAgent — The number of agents and the number of contacts.
- isAnalyticsProcessed — The number of contacts who have already been processed for Analytics (true) and the number that have not (false).
- isLogged — The number of interactions that were logged (true) and the number that were not logged (false).
- isOutbound — The number of interactions initiated by the contact (false) and the number of interactions initiated by an agent (true).
- isRefused — The number of interactions refused by an agent (true) and the number that were not refused (false).
- isShortAbandon —The number of contacts that spent time in the queue and hung up before the time specified in the short abandon interval (true) and the number that did not meet the short abandon threshold (false).
- isTakeover — The number of interactions that were taken over by a supervisor (true) and the number that were not (false).
- lastName — The number of contacts handled per agents. The agents are identified by last name, so agents sharing the same last name are combined.
- lastUpdateTime — The number of contacts organized by the date and time they were last updated.
- masterContactID — The number of contacts by the master or parent ID of one or more related contacts.
- mediaType — The number of interactions that occurred per media type, or channel. The bars might include 1 (email), 3 (chat), or 4 (call).
- mediaTypeName — The number of interactions that occurred per media type. Channel the bars might include Call, Chat, or Email.
- pointOfContactID — The number of contacts that entered the system per point of contact. Points of contact are identified by the numeric ID.
- pointOfContactName — The number of contacts that entered the system per point of contact. Points of contact are identified by name.
- postQueueSeconds — The number of seconds contacts spent in the system after the interaction ended.
- preQueueSeconds — The number of seconds contacts spent in the system before entering the queue.
- primaryDispositionID — The number of interactions assigned to each dispositionResult that the agent or system assigns to the contact when the interaction ends. as the primary disposition. The disposition is identified by its numeric ID.
- refuseReason — The number of contacts refused per reason. A blank bar indicates the contacts were not refused. See Contact History Report: Refusal Reasons for a list of refusal reasons.
- refuseTime — The date and time at which an agent refused the contact.
- releaseSeconds —
- routingTime —
- secondaryDispositionID — The number of interactions assigned to each disposition as the secondary disposition. The secondary disposition is identified by its numeric ID.
- serviceLevelFlag — The number of contacts marked with each service level flag:
- -1 — The contact never entered the queue
- 0 — An agent handled the contact within the required service level
- 1 — An agent did not handle the contact within the required service level
- skillID — The number of contacts handled by a skill. Skills are identified by numeric ID.
- skillName — The number of contacts handled by a skill. Skills are identified by name.
- teamID — The number of contacts handled by a team. Teams are identified by numeric ID.
- teamName — The number of contacts handled by a team. Teams are identified by name.
- toAddr — The contacts by the phone number, email address, or IP address they used during the transaction.
- totalDurationSeconds — The total duration of the interaction in seconds from the time the contact entered the system until the agent completed after call work.
- transferIndicatorID — The number of contacts that were transferred by transfer ID; the bars indicate how many contacts were transferred to a new agent (2), to a new skill (1), and not transferred at all (0).
- transferIndicatorName — The number of contacts that were transferred by transfer ID; the bars indicate how many contacts were transferred to a new agent (ReAgent), to a new skill (ReSkill), and not transferred at all (None).
- Number to Show
- The number of bars to show on the widget. Only the bars with the highest counts appear.
- Color
- The color you want the bars to be. You can use the color picker to select a color or type a hexidecimal code to select an exact color.
- Default View
- Specifies whether you want the widget to display the data in exact numbers or percentages by default. Users can view either one, but whichever you choose is what users see first when they open the Workspace and view the widget.
- Filters
-
You can filter based on the sentiment of the data or by the metric itself.
To view only contacts with a certain sentiment, select the checkbox corresponding to that sentiment and clear the other sentiment checkboxes.
To view only contacts that match certain metric thresholds, set the threshold by:
- If you selected a boolean Field, select True or False from the drop-down to show either only contacts where the field applies or only contacts where the field does not apply.
- If you selected a string Field like a name or ID, type the value in the text field. Only contacts where the specified condition exists appear in the widget.
- If you selected an integer Field, like seconds or counts, select an operator from the drop-down and enter an integer into the Value textbox. Only contacts that meet the specified threshold appear in the widget.
Click Add Filter.
Keywords Widget
You can customize the Keywords Widget to display a custom title, color the words differently, choose the number of keywords that appear in the chart, and filter by sentiment.
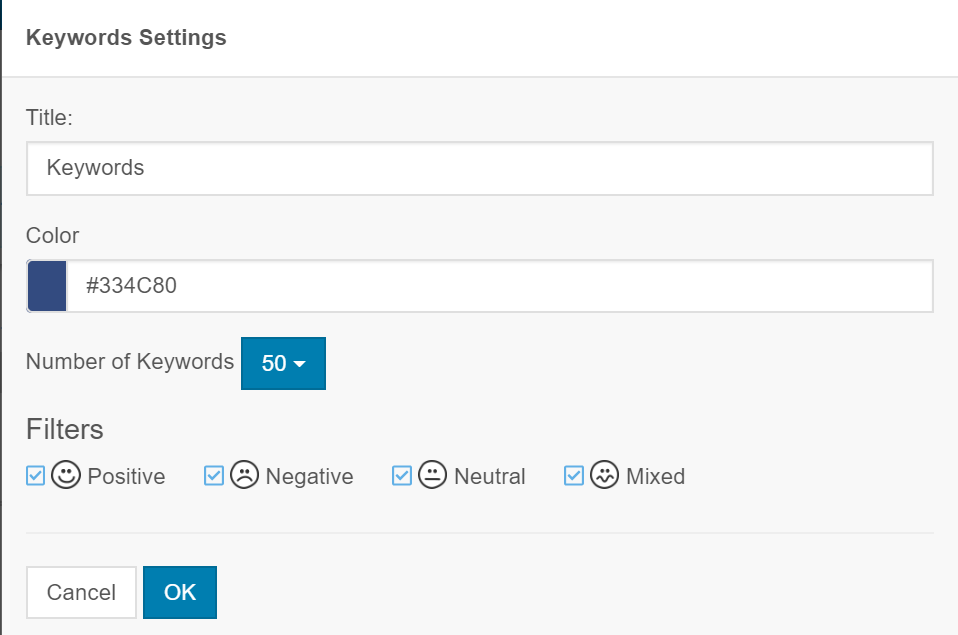
- Title
- The title that appears along the top of the widget. By default, the Title is Keywords.
- Color
- The color you want the words to be. You can use the color picker to select a color or type a hexidecimal code to select an exact color.
- Number of Keywords
- The number of keywords you want to appear in the chart.
- Filters
-
To view only contacts with a certain sentiment, select the checkbox corresponding to that sentiment and clear the other sentiment checkboxes.
Move a Widget on the Workspace
You can rearrange widgetsA graphical chart with data that meets specified filter criteria to help contact center supervisors and managers understand trends in the contact center. on the workspaceThe named view of one or more analysis widgets. to make important widgets more visible.
-
Click the workspace you want to modify to select it.
- Click Edit Workspace.
-
Click anywhere in the widget you want to move, drag it to the location you want it, and drop it. The widget becomes more transparent while you move it, and other widgets move out of the way to create space to drop the widget.
Resize a Widget
You can resize a widgetA graphical chart with data that meets specified filter criteria to help contact center supervisors and managers understand trends in the contact center. vertically to whatever size you want. Horizontally, you can choose between two sizes: half the workspace and the full width of the workspaceThe named view of one or more analysis widgets..
-
Click the workspace that contains the widget you want to modify to select it.
- Click Edit Workspace.
-
Hover your cursor over the edge of the widget you want to resize. When the cursor changes to a double arrow, click and drag the edge where you want it. Release the click. If you hover over a corner, you can adjust the height and width of the widget simultaneously.
- If the widget is not where you want it after resizing, move it to where you would like it.
Remove a Widget from the Workspace
-
Click the workspaceThe named view of one or more analysis widgets. you want to modify to select it.
- Click Edit Workspace.
-
Locate the widgetA graphical chart with data that meets specified filter criteria to help contact center supervisors and managers understand trends in the contact center. you want to remove from the workspace, then do either of the following:
- Click X in the top right corner of the widget.
-
Click anywhere in the widget, drag it to the trash icon, and drop it.


