Required security profile permissions: Scripts Create/Edit
Studio allows you to create scripts that control the routing and workflow of contacts in your contact center. With more than 150 actions and multiple script types, you can create highly customized scripts that meet your unique needs.
This topic uses a scripting example to explain how to create a script from the Tools tab. You can use this example as a basis for creating your own scripts using the same or different actions.
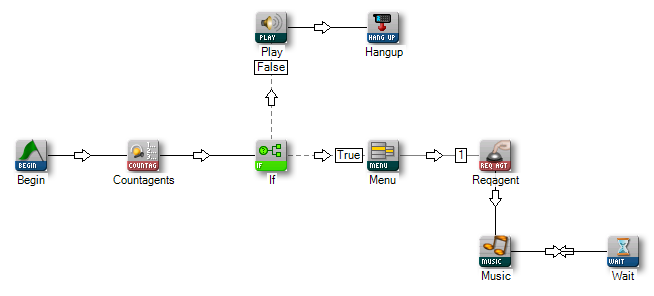
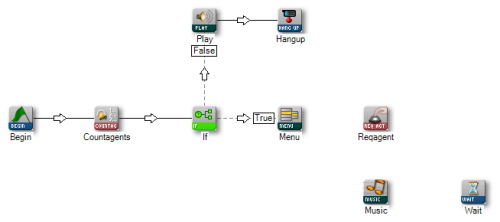
This topic explains how to create the script shown in the following image from the Tools tab, and provides a basis for creating your own scripts using the same or different actions. You can also choose to Script from the Framework Tab.
Before you can create scripts, you must Download and Install Studio. This task assumes you have done so, and that you have logged into the Studio application.
- Click File → New,.
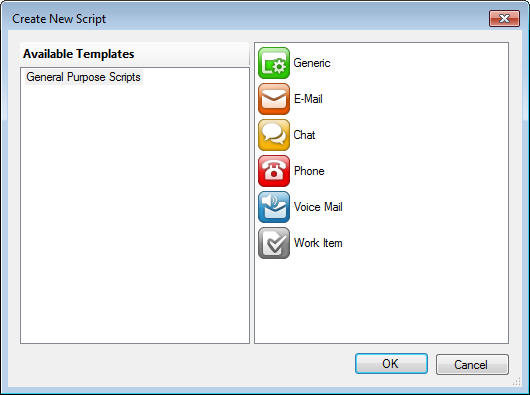
- Click the icon for the type of script you want to create, then click OK.
- Click the Tools tab to open the default palette and display the most commonly-used Studio actions.
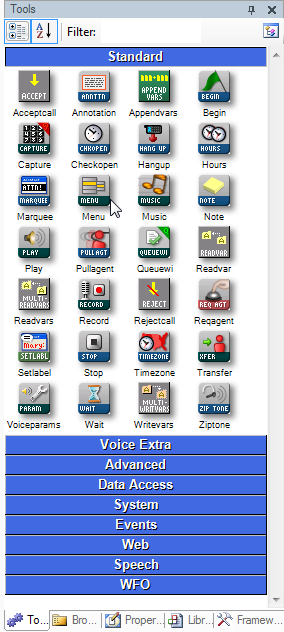
- In the Filter field, enter Begin to display the BEGIN action icon. Drag the icon to the central work area, or canvas.

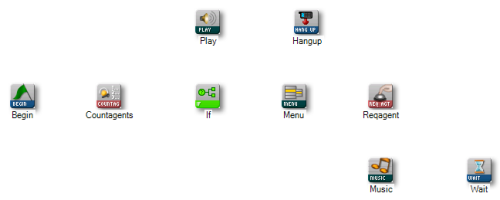
- Repeat the previous step for each of the actions shown in the image until all actions are on the canvas.
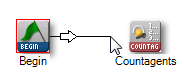
- Hover over the bottom right corner of the BEGIN icon until the connector indicator appears.

- Drag a connector from BEGIN to COUNTAGENTS:
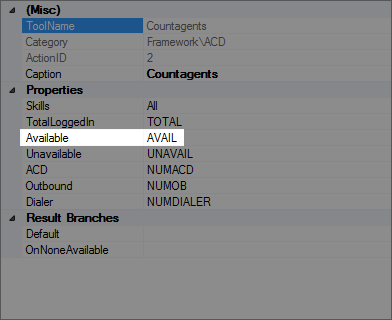
- Right-click the COUNTAGENTS icon to display the action properties and note the value in the Available field. This image shows that value as the default, AVAIL. Click anywhere in the canvas to close the Properties window
- Drag a connector from COUNTAGENTS to IF. The IF action uses a conditional expression to introduce a logic branch in the script.
- When the Pick Branch window appears, select Default and click OK. For more information on branches, see Branches Overview.
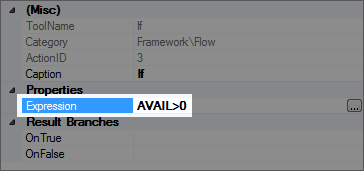
- Right-click the IF icon, and in the Expression field, change the value from B1 to AVAIL>0.
This establishes that the default branch is followed if the COUNTAGENTS variable AVAIL has a value greater than zero.
- Drag a connector from IF to PLAY.
- When the Pick Branch window appears, click False and then click OK.
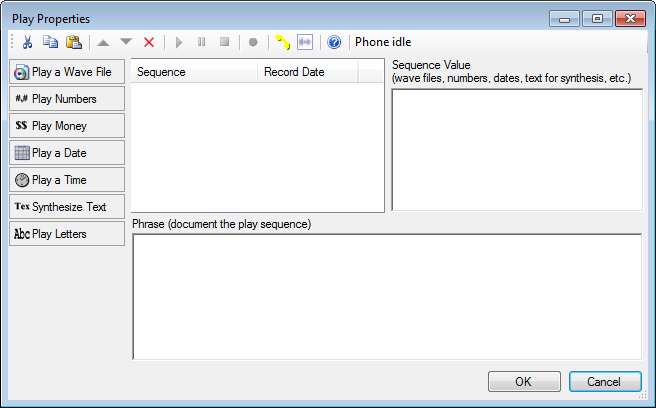
- Double-click the PLAY action to display the Play Properties window (also known as the Prompt Manager).

- Click Synthesize Text.
- In the Sequence Value field, enter the message you want callers to hear when no agents are available. For example, you might type: We are currently experiencing technical difficulties. Please try your call again later.
- Copy the text from the Sequence Value field and paste it into the Phrase (document the play sequence) field.
- Click OK.
- Drag a connector from PLAY to HANGUP.
- In the Pick Branch window, select Default and click OK.
- Drag a connector from IF to MENU.
- In the Pick Branch window, select True and click OK. After this step, your script should look like the following image:
- Double-click the MENU icon.
- Click Synthesize text.
- In the Sequence Value field, type Press 1 to speak to a representative.
- Copy the text from the Sequence Value field and then paste it into the Phrase (document the play sequence) field.
- Click OK.
- Drag a connector from MENU to REQAGENT.
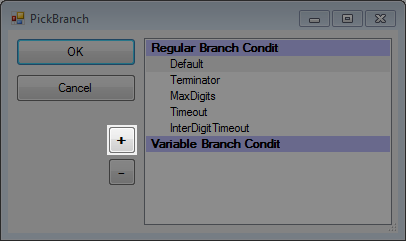
- When the Pick Branch window appears, click the plus sign to add a variable branch.
- Type a value of 1 to replace the default value New:
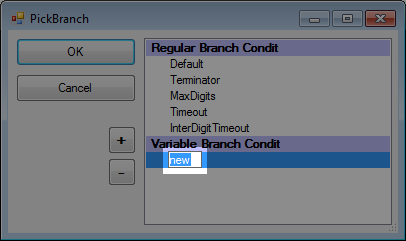
- Click OK.
- Right-click the REQAGENT icon to display the action properties:
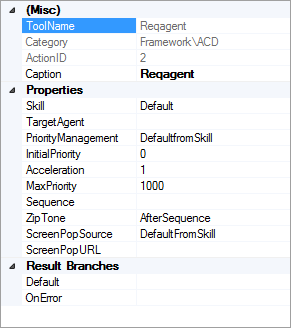
- In the SkillClassification used to facilitate the delivery of contacts; assigned to agents based on abilities, specialties, and knowledge property, click the drop-down and replace Default with a specific skill. When you are done, click anywhere on the canvas.
- Drag a connector from REQAGENT to MUSIC.
- In the Pick Branch window, select Default and then click OK.
- Right-click anywhere on the MUSIC icon to display the action properties:
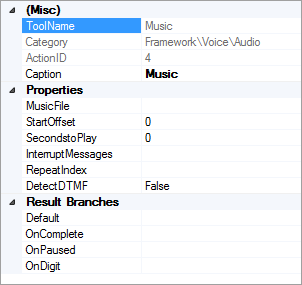
- Click the drop-down in the MusicFile field and select a .wavWAVeform audio file; used to store audio bitstreams such as call recordings. file to be played. When you are done, click anywhere on the canvas.
- Drag a connector from MUSIC to WAIT.
- In the Pick Branch window, select Default ad click OK.
- Drag a connector from WAIT back to MUSIC.


When you are finished, your script should look like the image at the beginning of this page.


